Connect Whop to WooshPayment
Click-by-click guide to link Whop to WooshPayment with a one-time product, Product ID, Company API Key and webhook signing secret.
Connect Whop to WooshPayment — visual 2026 guide
Whop is the payment processor WooshPayment uses to accept cards and, when account/domain/device conditions are compatible, wallets such as Apple Pay and Google Pay. The technical connection requires every step below: API key, Product ID, webhook signing secret and a real test before traffic.
What you'll end up with: three values to paste into WooshPayment Dashboard → Integrations → Whop:
- API Key (
apik_xxx...) — generated from Developer → Company API keys - Product ID (
prod_xxx...) — taken from the URL of the Access Pass product you'll create - Webhook signing secret (
ws_xxx...) — copied from the Whop webhook that points to WooshPayment
Why you need a Product ID
WooshPayment creates each checkout as a "sale" of your Whop product. So you need a dedicated Whop product where all your store's sales land. The product must be:
- One-time payment, not recurring
- With no fixed pricing plan: we set the price at runtime from the customer's cart
Without a Product ID, the Whop iframe in the checkout doesn't know where to create the invoice and stalls with an error.
The whop.com screenshots (steps 1–8, 10) are illustrative renderings of the Whop UI (those would require Whop Business credentials we can't ship here). Step 9 is a real screenshot of the live WooshPayment Dashboard Integrations page; step 11 is the real WooshPayment checkout page.
Prerequisites
- Whop Business account (not Personal) with a Company already created
- Administrator permissions on the Company (Owner works too)
- Verified email + basic legal data filled in (required for payouts > $500/month)
If you don't have a Whop account yet: sign up here, then come back to this guide.
1. Open the Products section in your Whop
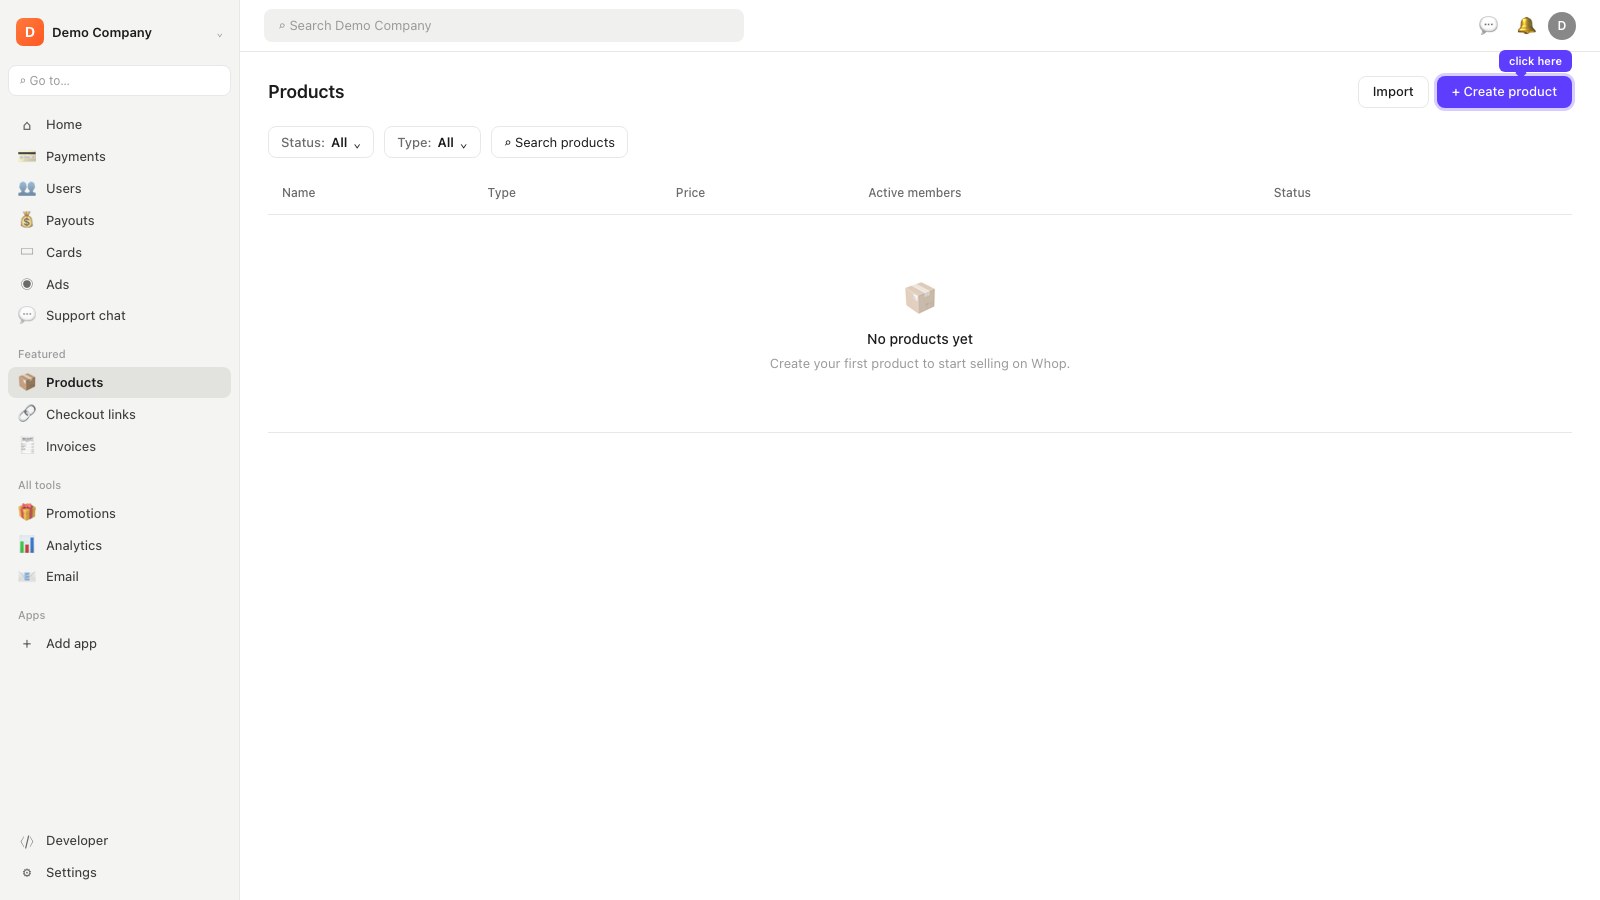
- Go to whop.com/dashboard and select the right Company in the top-left
- Sidebar → Products (in the "Featured" section)
You'll see your product list (empty if it's your first). At the top right is the + Create product button.
2. Click "+ Create product" and fill in details
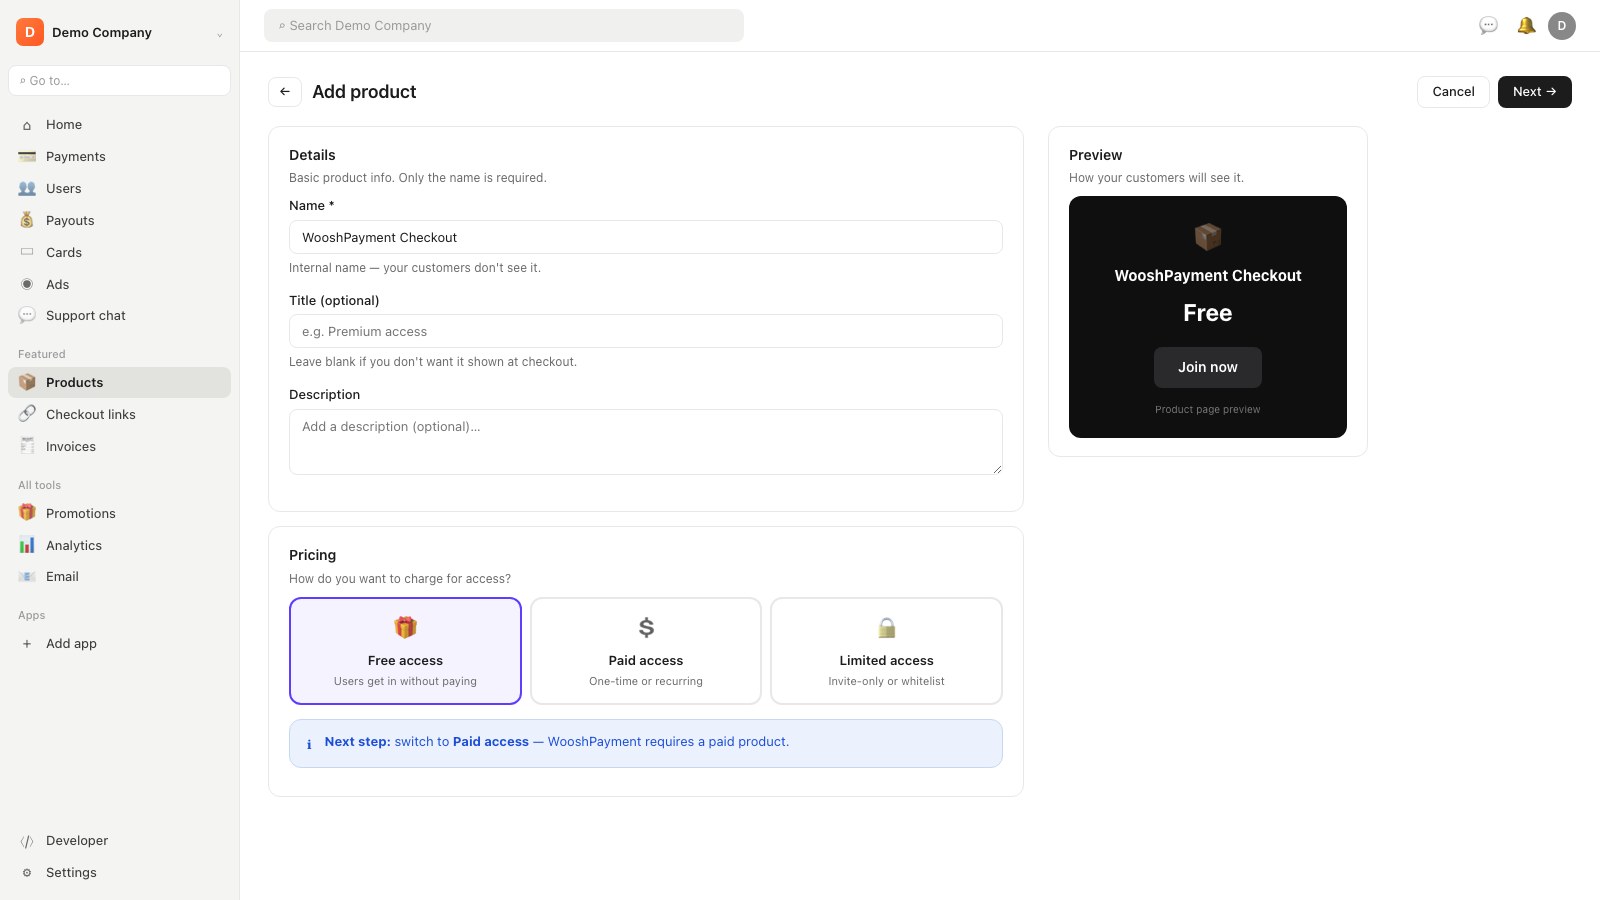
- Click + Create product at the top right
- The Add product page opens with:
- Name (required): write something like
WooshPayment Checkout— internal name, your customers don't see it - Title (optional): you can leave it blank
- Name (required): write something like
- Pricing section below: default is "Free access" ← we change this in the next step
3. Click "Paid access"
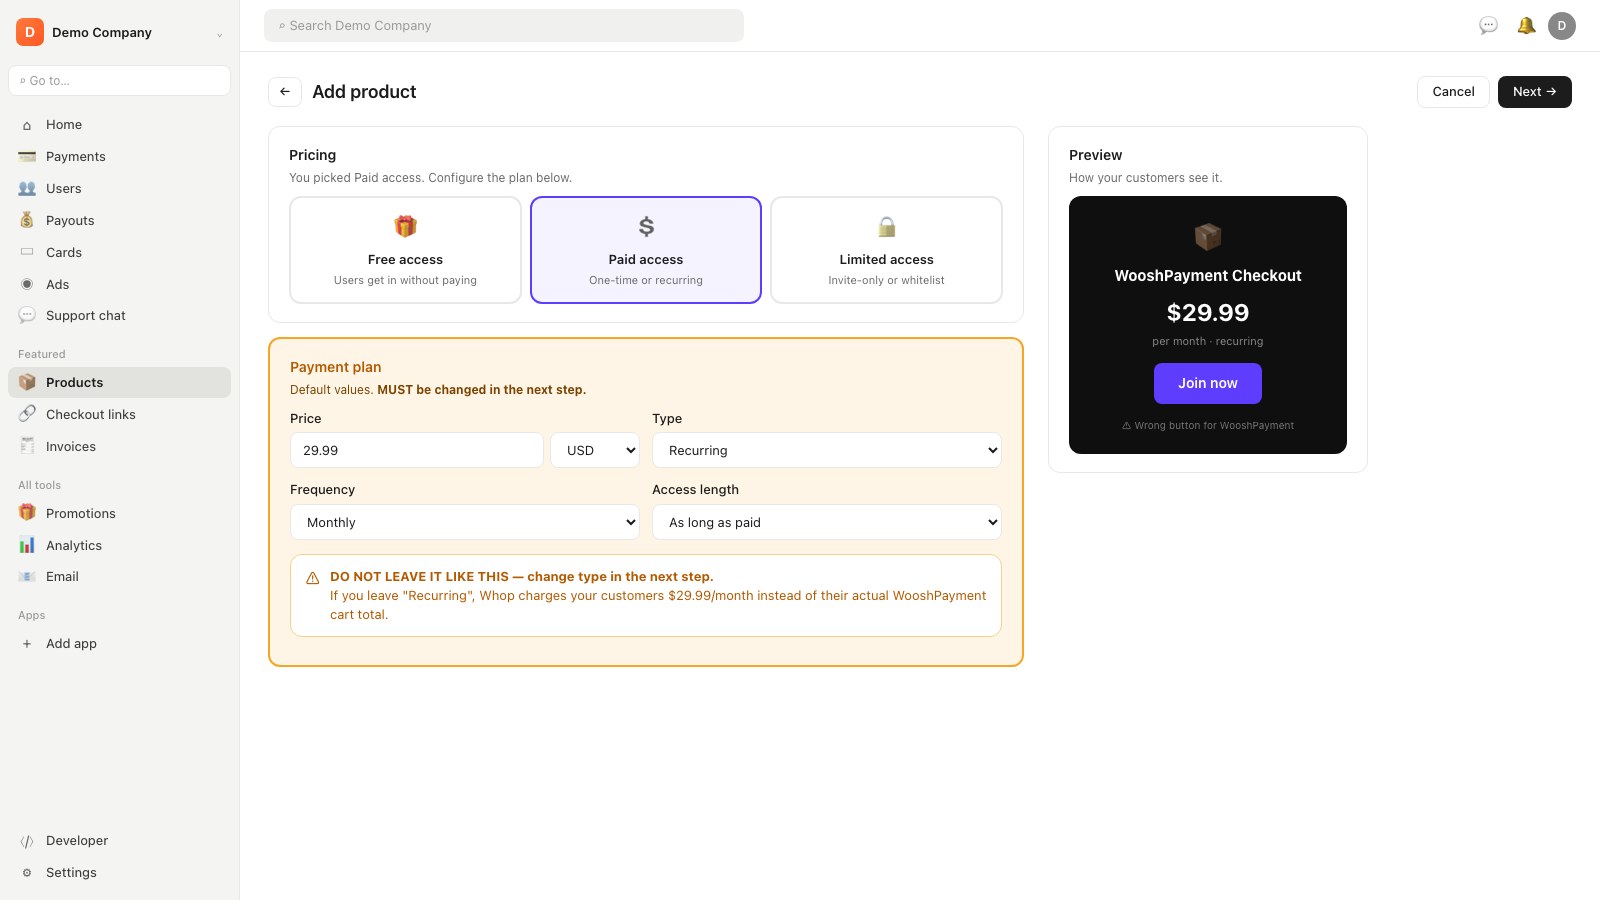
In the Pricing section, click the Paid access card (second one, dollar icon).
Whop immediately shows a price card with default values: 29.99 USD / month, type Recurring.
⚠ DO NOT LEAVE IT LIKE THIS. If you leave "Recurring", Whop will charge your customers the recurring plan amount instead of the WooshPayment cart total. Change the type in the next step.
4. Change the type from "Recurring" to "One-time"
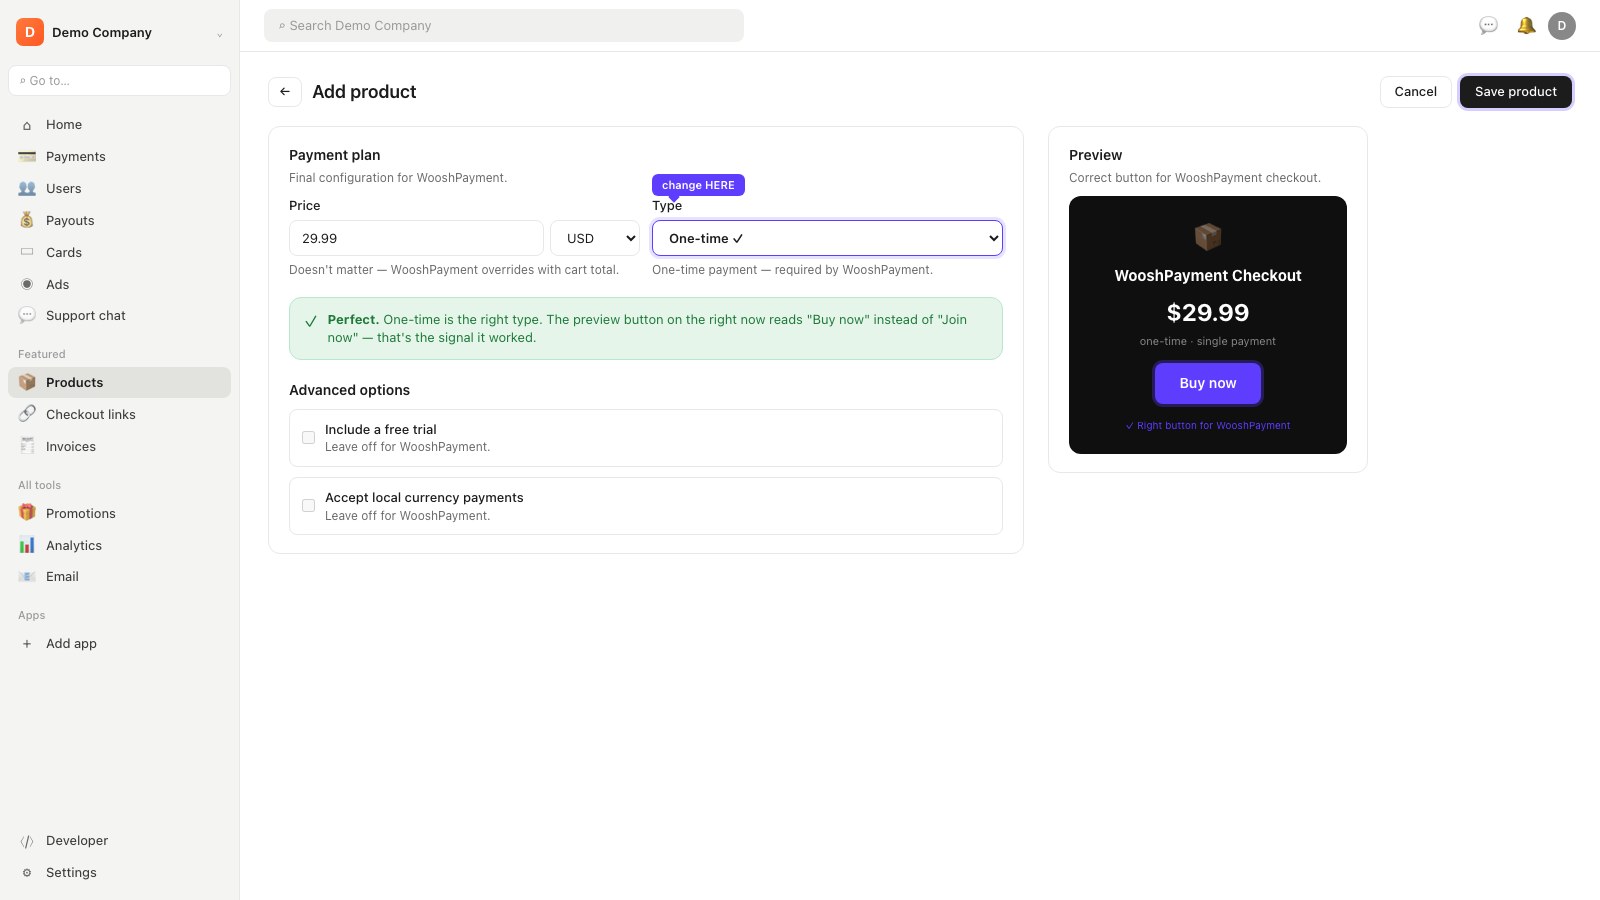
- Click the Recurring dropdown (below the price)
- Select One-time payment
- Verify the preview on the right now shows the "Buy now" button (no longer "Join now") — that's the signal that the type changed correctly
- The default
29.99 USDprice doesn't matter — WooshPayment overrides it with the customer's actual cart total — leave it - Leave the other toggles off: no "Include free trial", no "Accept payments in local currency"
Top right click Next to reach the App step (skip: WooshPayment doesn't use Whop apps) → Next again → Page step (skip) → finally Save product at the top right.
5. Copy the Product ID (prod_xxx) from the URL
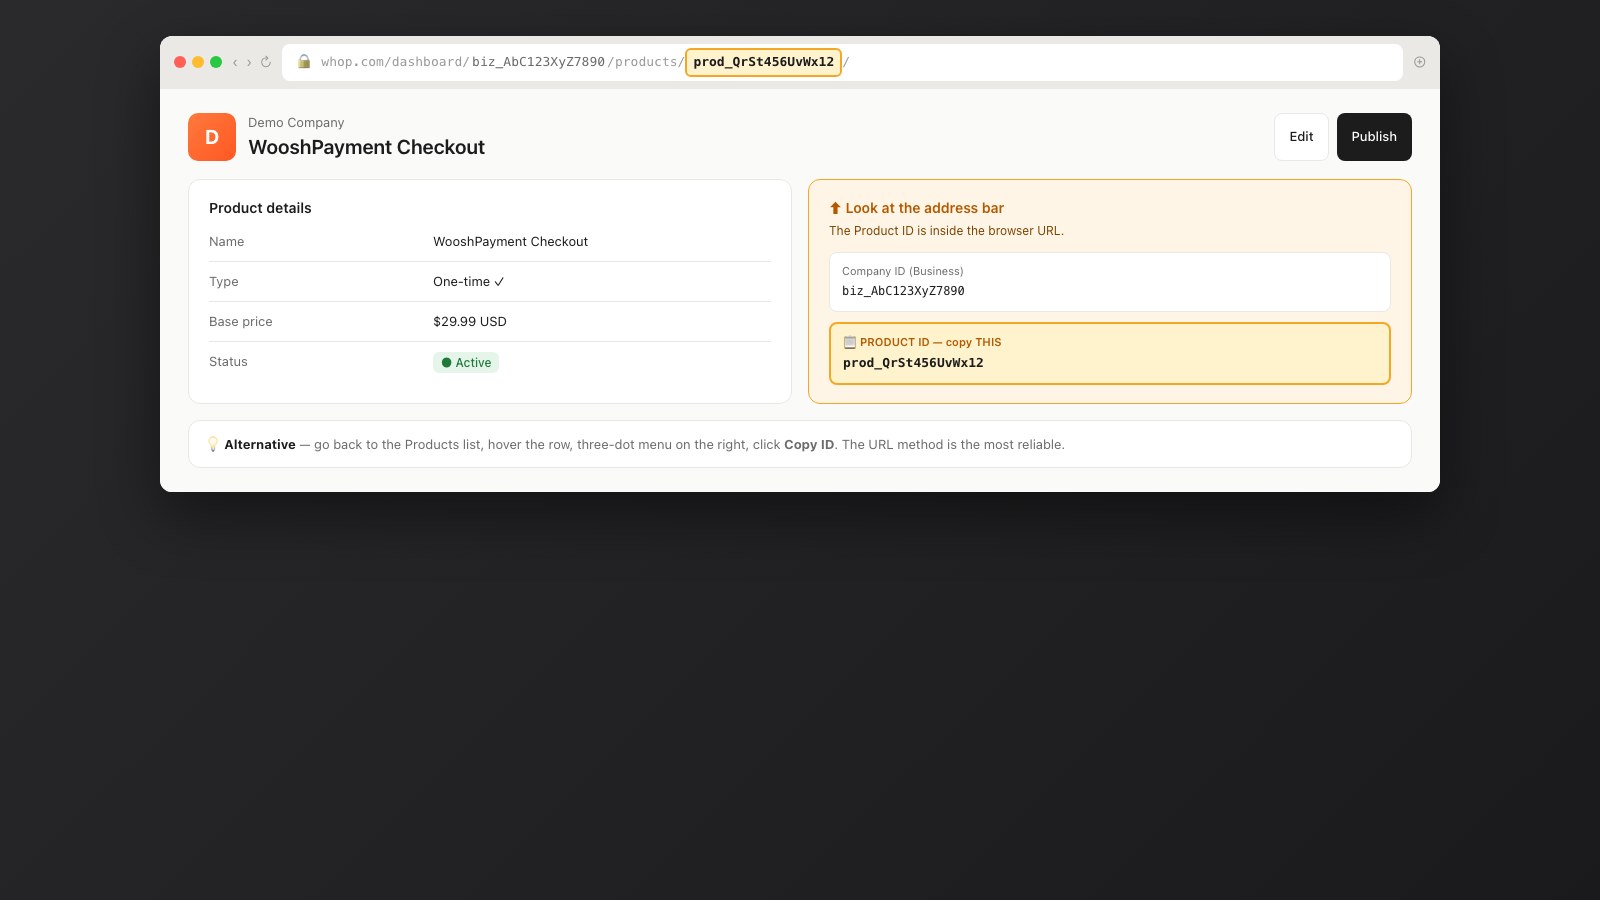
After saving, Whop takes you to the page of the product you just created. Look at the browser address bar: it contains the product ID in the format prod_xxxxxxxxxxxxx.
Example URL:
https://whop.com/dashboard/biz_eKNqey9jlu9Qe0/products/prod_79AacrnFwMXjs/
                                                       ^^^^^^^^^^^^^^^^^^
                                                       this is your Product ID
Copy it — you'll need it later in WooshPayment.
Alternatively you can grab the prod_xxx from the Products list: hover the row → three-dot menu on the right → often exposes "Copy ID". The URL method is the most reliable.
6. Generate the API Key

- Whop sidebar → Developer (bottom, above Settings)
- You land on the Company API keys page
- You see the list of existing keys (empty if it's your first time) + a + Create button top right
7. Click "+ Create" → role "Administrator"
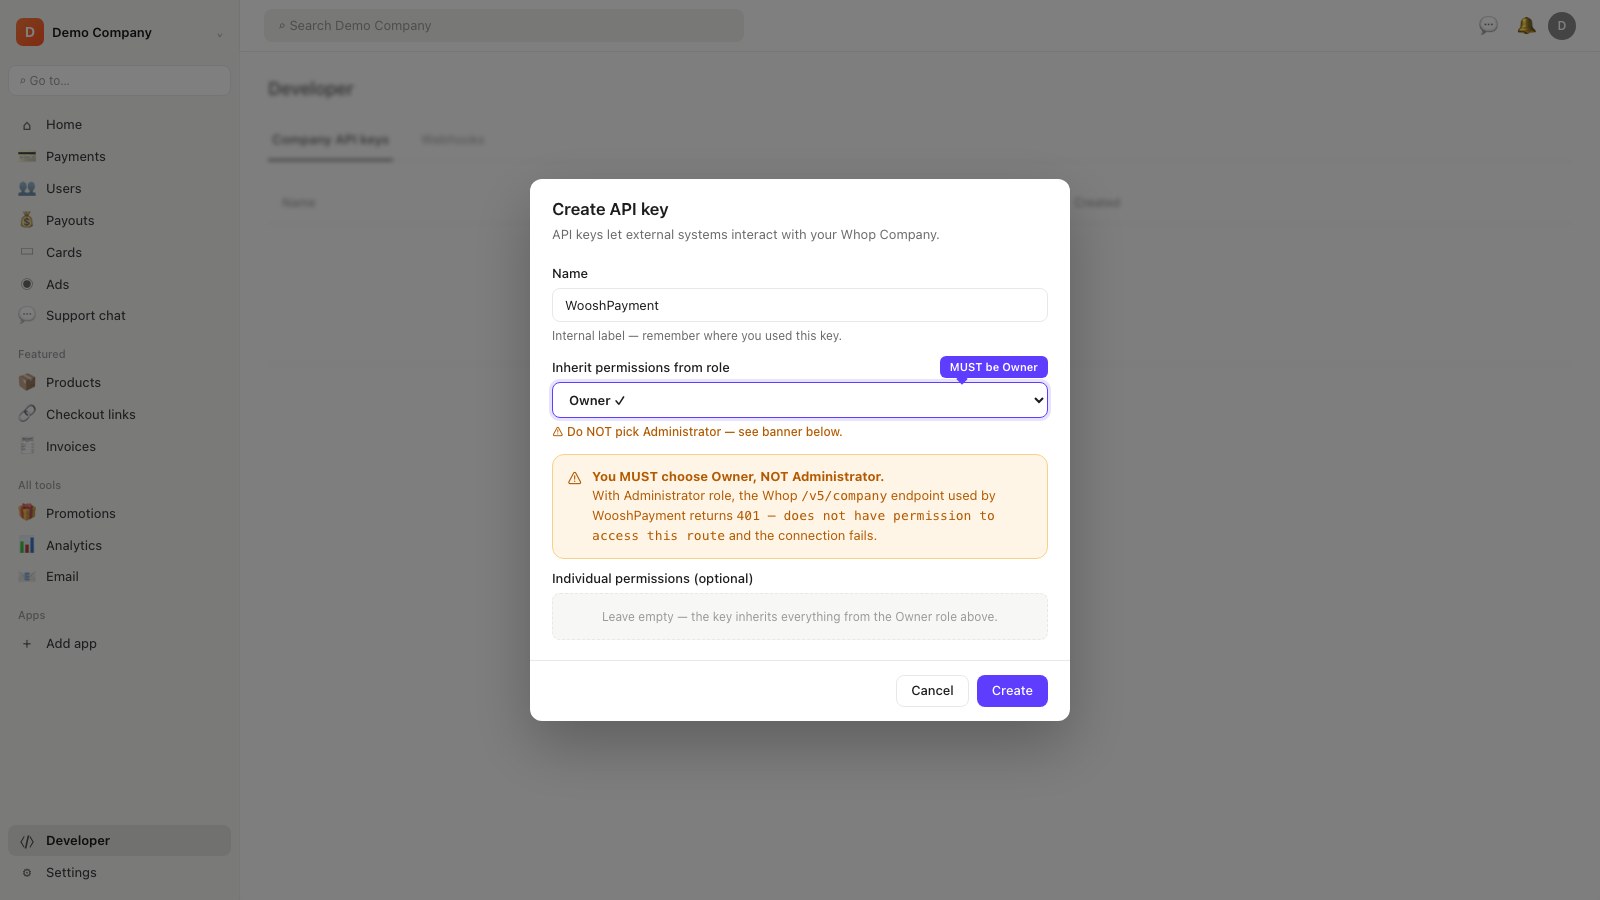
- Click the + Create button in the Company API keys section
- The Create API key modal opens with:
- Name: write something like
WooshPayment(this is just an internal label so you remember where you used it) - Inherit permissions from role: dropdown defaults to Administrator
- Name: write something like
- Leave Administrator selected, or choose Owner if you prefer
- Do NOT tick individual permissions — inherit everything from the role
- Click Create at the bottom right
The key must inherit sufficient Company permissions. If the Whop /v5/company endpoint returns 401 — does not have permission to access this route, come back here and recreate the key with Administrator or Owner role.
8. Copy the API Key
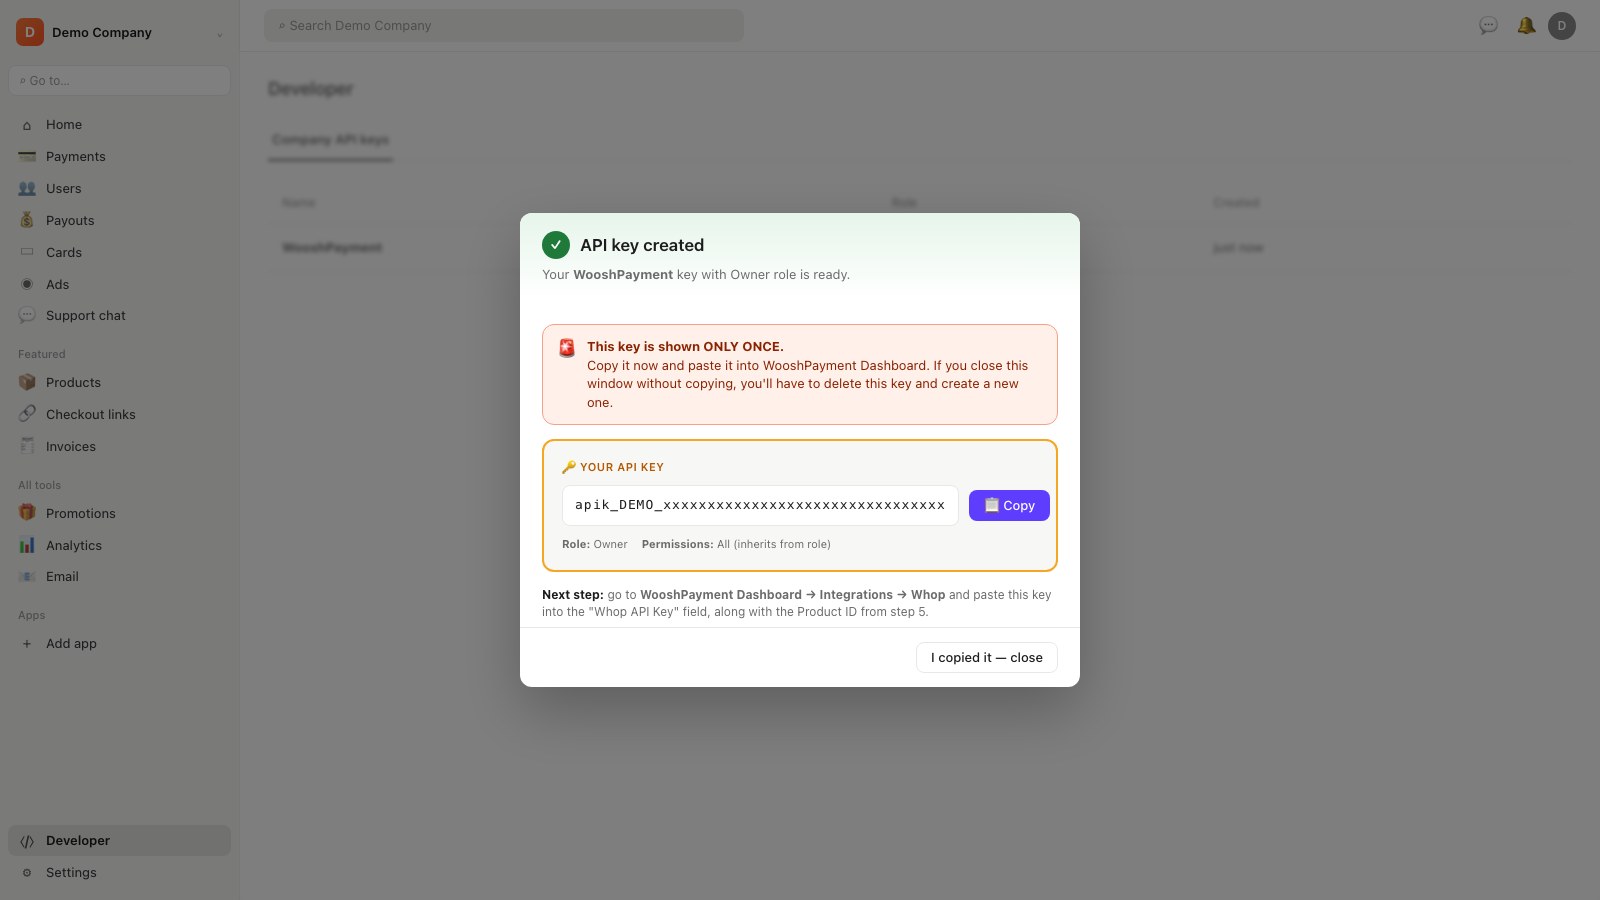
After clicking Create, Whop shows you the key in format apik_xxxxxxxxxxxxxxxxxxxxxxxxxxxxxxxxx. Copy it now — Whop only shows it once. If you lose it, delete and create a new one.
9. Paste the API key and Product ID into WooshPayment
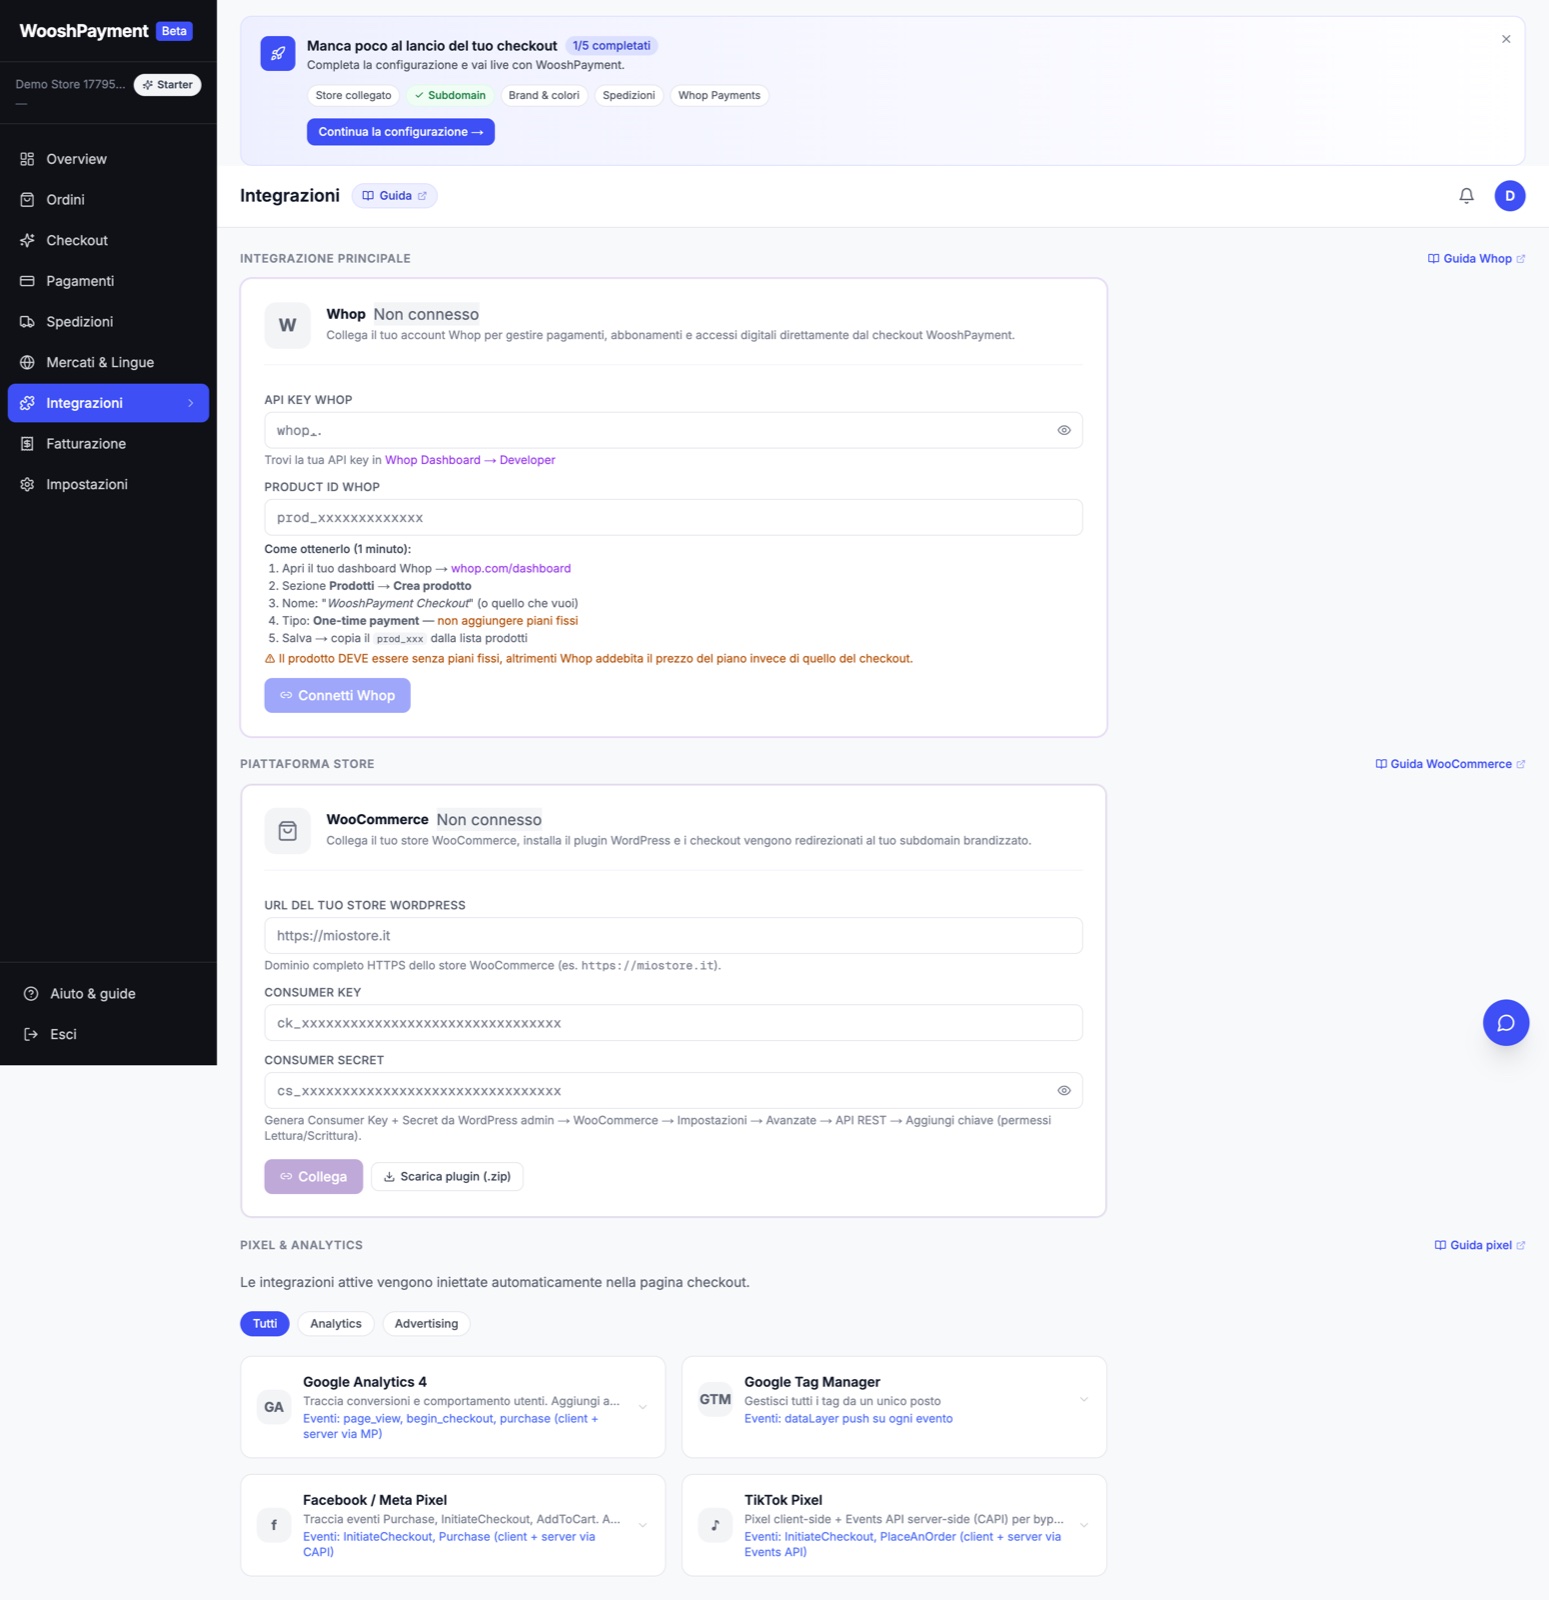
Now go to the WooshPayment Dashboard:
- Go to Dashboard → Integrations (wooshpayment.com/dashboard/integrations)
- Scroll to the purple Whop card
- Fill in the fields:
- Whop API Key: paste
apik_...(the key you just copied) - Product ID: paste
prod_...(the ID from the product URL) - Webhook signing secret: if you already created it, paste
ws_...; otherwise complete step 10 and save the secret right after
- Whop API Key: paste
- Click Connect Whop
Response in ~1 second:
- ✅ The API key is validated and the Business ID is saved
- ⚠️ The card still needs completion until you add the webhook signing secret from step 10
- ❌ If red: see the Troubleshooting section below
What the backend does behind the scenes:
- Tests the API key against
https://api.whop.com/v5/company(6s timeout) - Tests that
prod_xxxexists and belongs to your Company (api.whop.com/api/v2/products/{prod_xxx}) - If both 200 → saves everything encrypted (AES-256-GCM):
whopApiKey,whopBusinessId,whopAccessPassId, optionalwhopWebhookSecret,whopConnected=true - For Apple Pay, a best-effort domain registration attempt may run, but treat Apple Pay as ready only after verifying the domain in your Whop dashboard by following Apple Pay
10. Configure the webhook (one-time, manual)
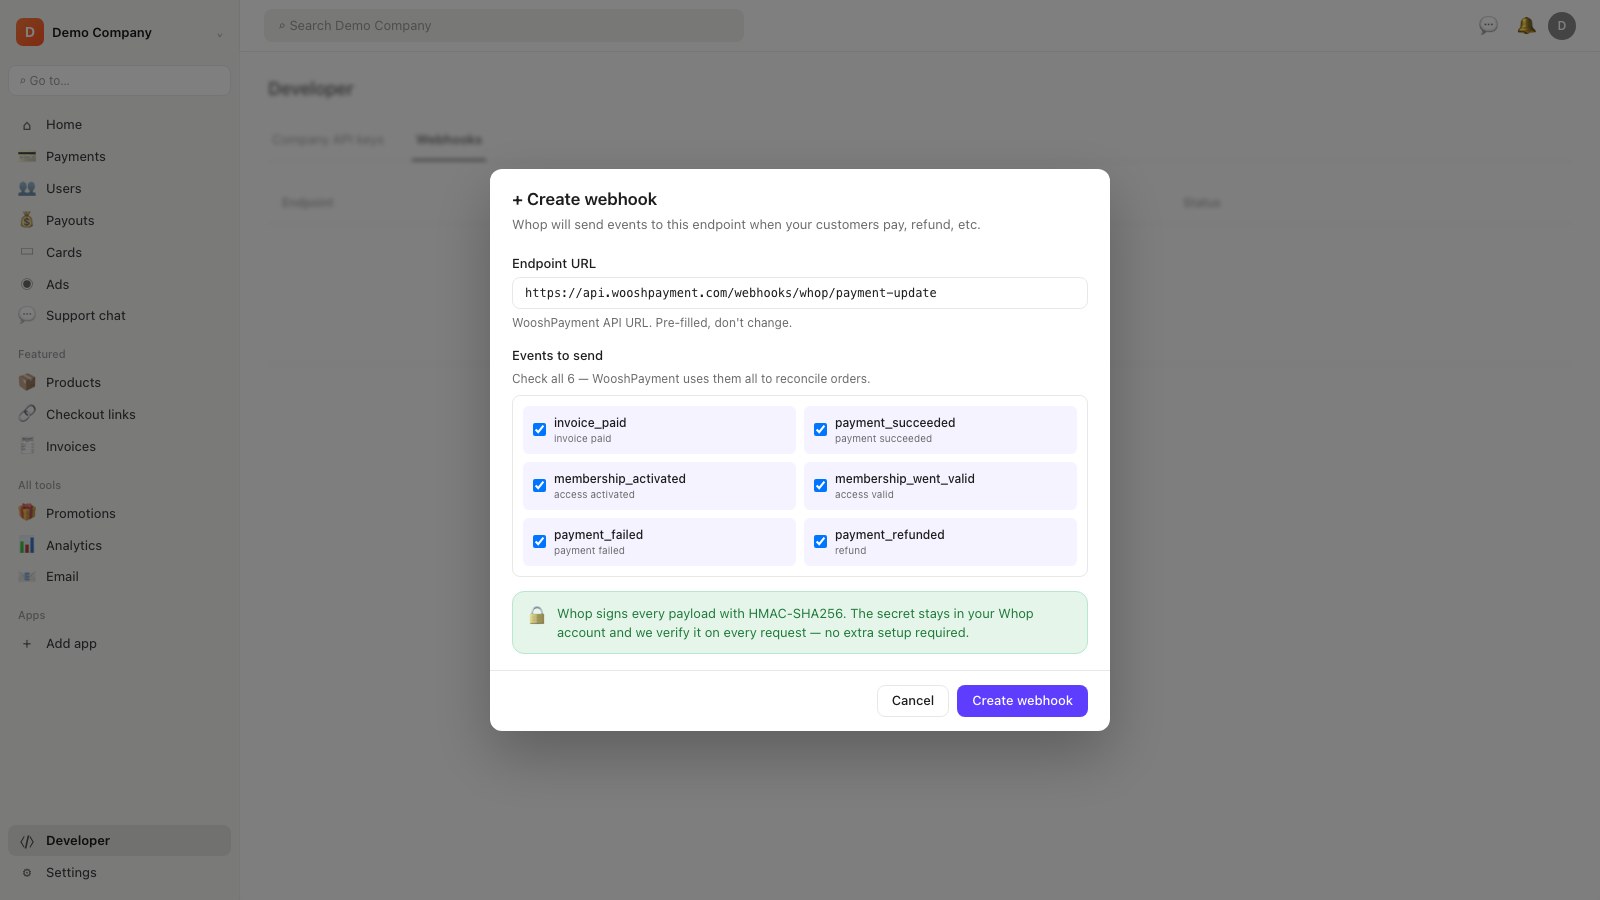
To receive payment notifications, the Whop webhook must point to us:
- Whop Dashboard → Developer → scroll to Webhooks
- Click + Create webhook
- Endpoint URL:
https://api.wooshpayment.com/webhooks/whop/payment-update - Events to check (minimum required):
invoice_paidpayment_succeededmembership_activatedmembership_went_validpayment_failedpayment_refunded
- Save.
- Open the webhook you just created, copy the Signing secret (
ws_...) and paste it into WooshPayment → Dashboard → Integrations → Whop → Webhook signing secret. - Save the secret in WooshPayment. The Whop card should turn green/ready.
If the webhook is not configured, or if the signing secret is not saved in WooshPayment, sessions may stay PENDING/in recovery and orders are not created in real time. A merchant is considered ready only when API key, Product ID and webhook secret are all present.
11. Verify the money-path
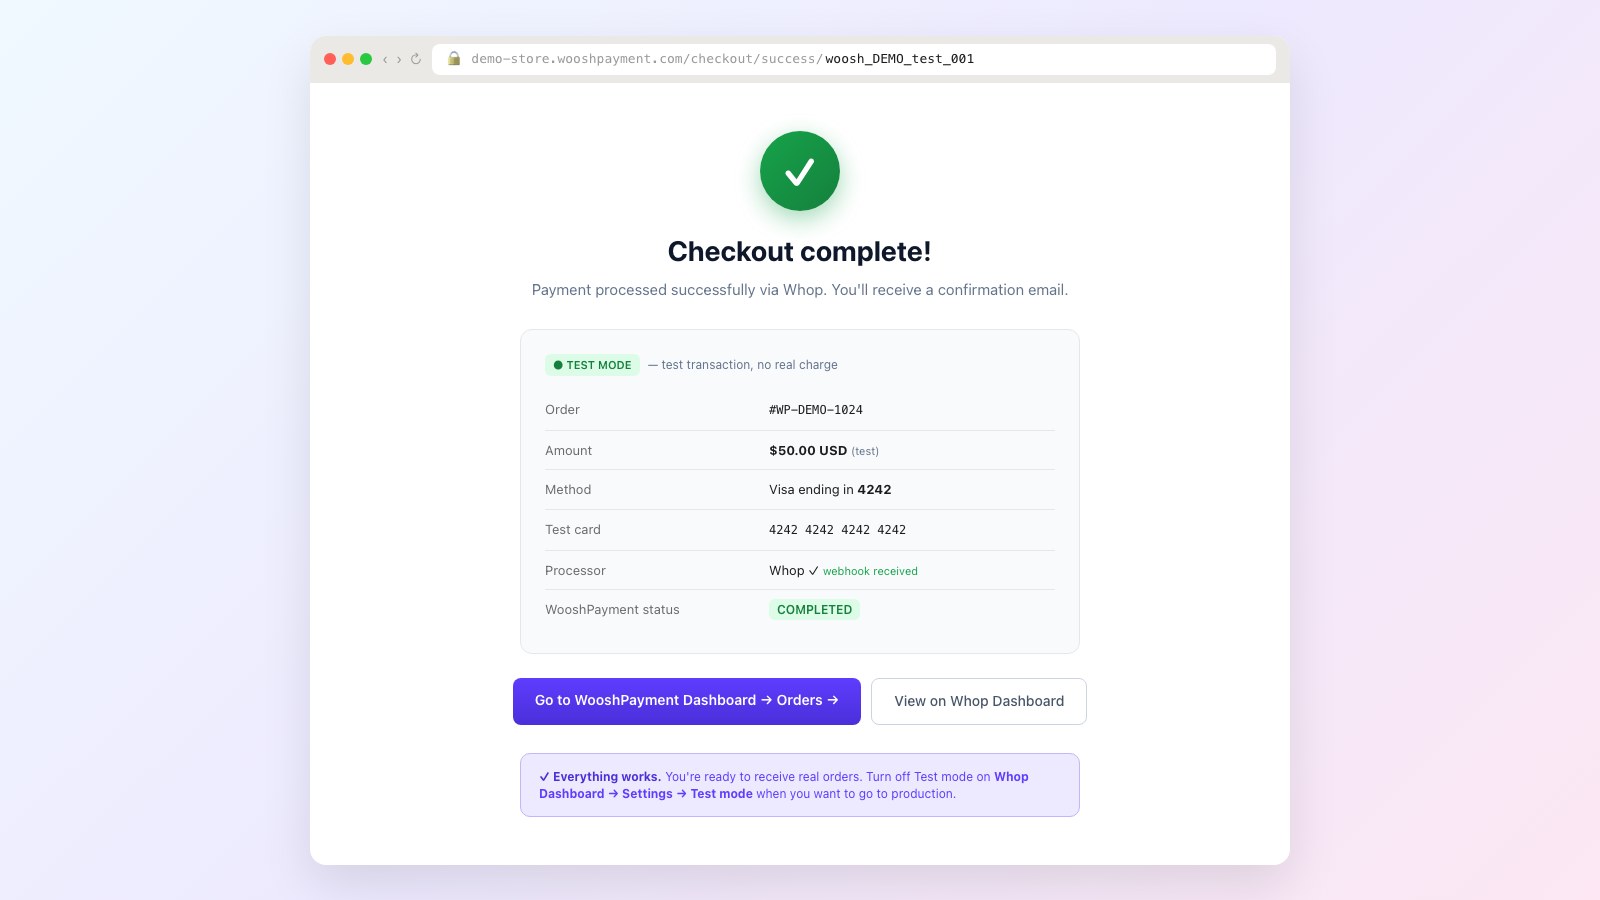
Quick end-to-end test:
- Open your test checkout at
{your-slug}.wooshpayment.com/checkout/... - Fill in email + address
- If you are in production, complete a small real payment from the live cart. Use test cards only if support explicitly enabled the Whop sandbox on your merchant.
- Click Pay
- You should see the checkout marked
COMPLETEDin WooshPayment Dashboard → Orders - On Whop Dashboard → Payments you'll see the invoice with the right total
- Before traffic, also verify the Shopify/Woo store order, customer/merchant emails, pixel/CAPI and return page
If you are in sandbox and the test card is declined, check that the Whop sandbox environment is actually enabled on the merchant. If you are in production, a test card does not certify the money-path: use a small real payment.
Troubleshooting
401 — does not have permission to access this route
The API key was generated with a role that is too low or custom permissions that are insufficient. Go back to step 7, recreate it with Administrator or Owner role, then replace the old key in WooshPayment.
Invalid Product ID — prod_xxx not found
The ID is from a product belonging to a different Company, or you mistyped it. Verify:
- The URL
whop.com/dashboard/biz_xxx/products/prod_xxx/should havebiz_xxxequal to theBusiness IDshown in WooshPayment Dashboard - No leading/trailing spaces
- The prefix is
prod_, notprd_orproduct_
Wrong amount charged (e.g. $29.99 instead of $50)
The Whop product was saved with Recurring type instead of One-time. Go back to the Whop product → Edit → change the dropdown to One-time → Save. No need to reconnect on WooshPayment.
Whop asks me to verify my identity
Whop blocks payouts > $500/month if you haven't uploaded:
- ID (passport or ID card)
- Address (utility bill or bank statement)
- For companies: business registration
Do not send traffic relying on payouts until the verification requested by Whop is completed or clarified in your account.
I regenerated the API Key and now everything is broken
The old one stops working immediately. Go to WooshPayment Dashboard → Integrations → Whop → Disconnect → paste the new key + same prod_xxx → Connect Whop.
Whop iframe loads empty / Apple Pay doesn't show up
Three possible causes:
- Apple Pay: only visible on Safari with a Wallet card configured. On Chrome/Firefox/other it doesn't appear.
- Domain not verified: your checkout subdomain (
{slug}.wooshpayment.comor your custom domain) is not registered as an Apple Pay domain on your Whop. See Setup Apple Pay. - Webhook missing: see step 10 above. Without webhook, sessions get stuck.
Detailed fees (Whop)
Whop fees are set by Whop and can vary by country, category, risk profile, payout method and currency conversion. Check the live fee table in your Whop account before sending traffic.
WooshPayment fees depend on your active plan; Whop fees remain separate and must be checked in your Whop account.
FAQ
Can I use Stripe instead of Whop?
Not in the current public product. WooshPayment uses Whop for cards/wallets; alternatives are evaluated only as custom integrations.
Can I use an existing Whop product that already has fixed plans?
No. WooshPayment requires a dedicated product with One-time type and no plans. Create a new product just for WooshPayment following this guide.
What if I add a second Product to WooshPayment?
For now WooshPayment uses one Product ID per merchant. Multi-product is on the roadmap for merchants with multiple brands under the same Whop Company.
Does the Whop connection auto-renew? Does it expire?
The API Key doesn't expire. It stays valid until:
- You regenerate it manually
- You remove the Company role from the user that created it
- Whop revokes your account (TOS violation)
In all these cases, reconnect by following this guide.
Next steps
- Setup Apple Pay — register the checkout subdomain on your Whop
- Refund flow — how to handle refunds
- Webhook spec — payload + HMAC security