WooCommerce plugin — guided install
Install the official "WooshPayment Checkout" WordPress plugin on your WooCommerce store, then complete REST API keys, Whop/COD, active plan and a pilot order before traffic.
WooCommerce plugin — guided install
The recommended path to connect the WooCommerce checkout redirect to WooshPayment: install the official plugin, activate it, then complete the store connection with REST API keys. No PHP snippets in your theme, no extra Code Snippets plugin. To create orders back in WooCommerce after payment, you still also need WooCommerce REST Consumer Key + Consumer Secret, configured during onboarding or in Integrations.
Note: REST API keys are still required to create orders back in WooCommerce after payment, but they do not replace the plugin. If your hosting blocks custom plugins, contact support before launch: a custom integration must be validated.
All screenshots in this guide show the WordPress admin interface (it requires WordPress admin credentials we can't ship here). They are illustrative renderings of the actual plugin install flow.
Prerequisites
- WordPress 6.0+ with WooCommerce 7.0+ active
- "Post name" or similar permalink structure enabled (WP Admin → Settings → Permalinks → anything other than "Plain"). Required for the WC Store API the plugin calls.
- Permission to install plugins (Administrator role)
- A WooshPayment account created or an active invite. The plugin is installed during onboarding; before traffic you also need WooCommerce REST API keys, Whop/COD configured, an active plan, and a real checkout test.
1. Download the plugin
Direct button:
⬇ Download wooshpayment-checkout.zip
The zip contains one PHP file + readme.txt. Zero external dependencies, no third-party libraries.
The plugin is open-source (MIT). You can inspect the source before installing. In short: it only loads the official script on cart/checkout pages, shows a WordPress admin health-check page, does not save permanent configuration in the DB, and does not modify catalog, orders, or theme files. It only uses a 5-minute WordPress transient to cache the health-check state.
2. Upload to WordPress
Step 2.1 — Plugins → Add new
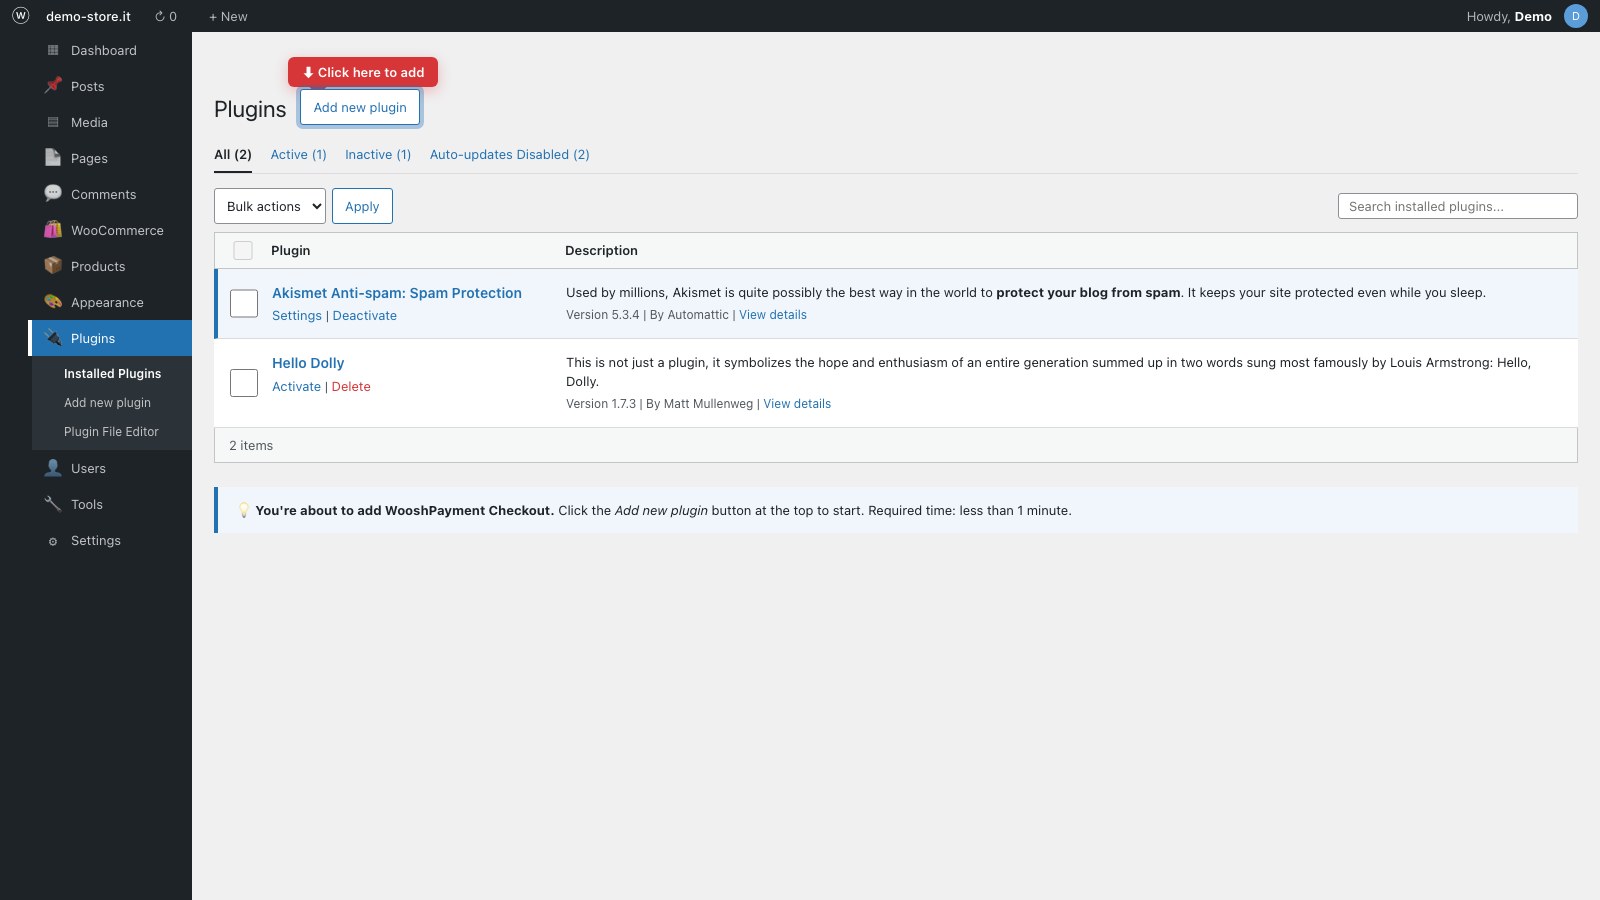
Go to WordPress Admin → Plugins → Add new plugin (link at the top).
Step 2.2 — Upload plugin (don't search)
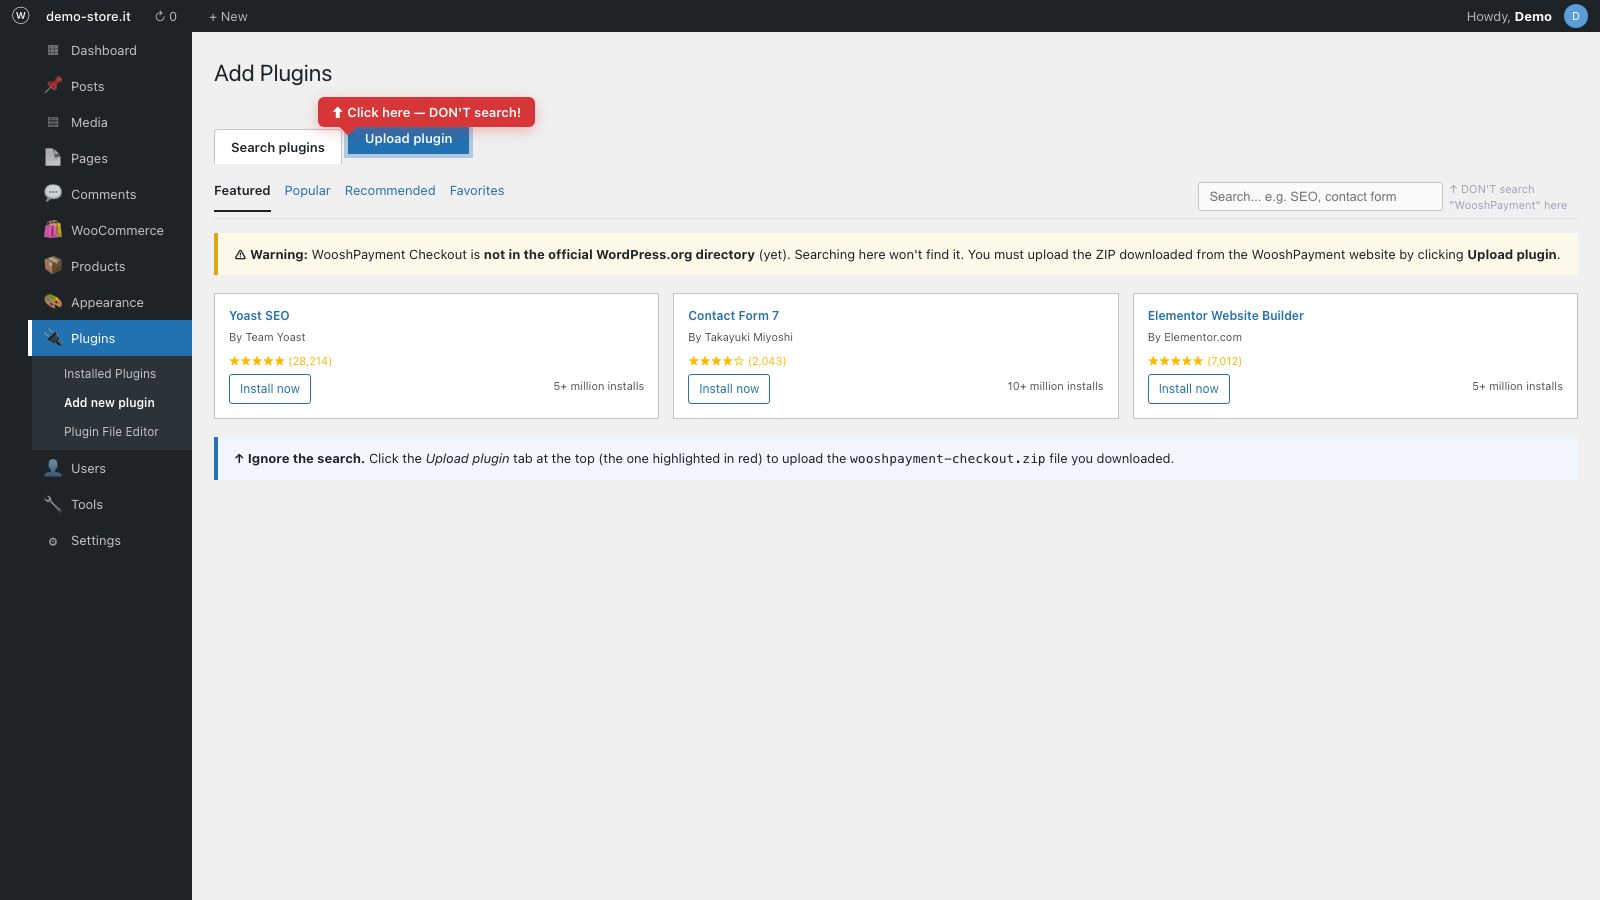
You'll see two tabs at the top: "Search plugins" and "Upload plugin". Click Upload plugin — do NOT search the marketplace.
Step 2.3 — Choose the file and install
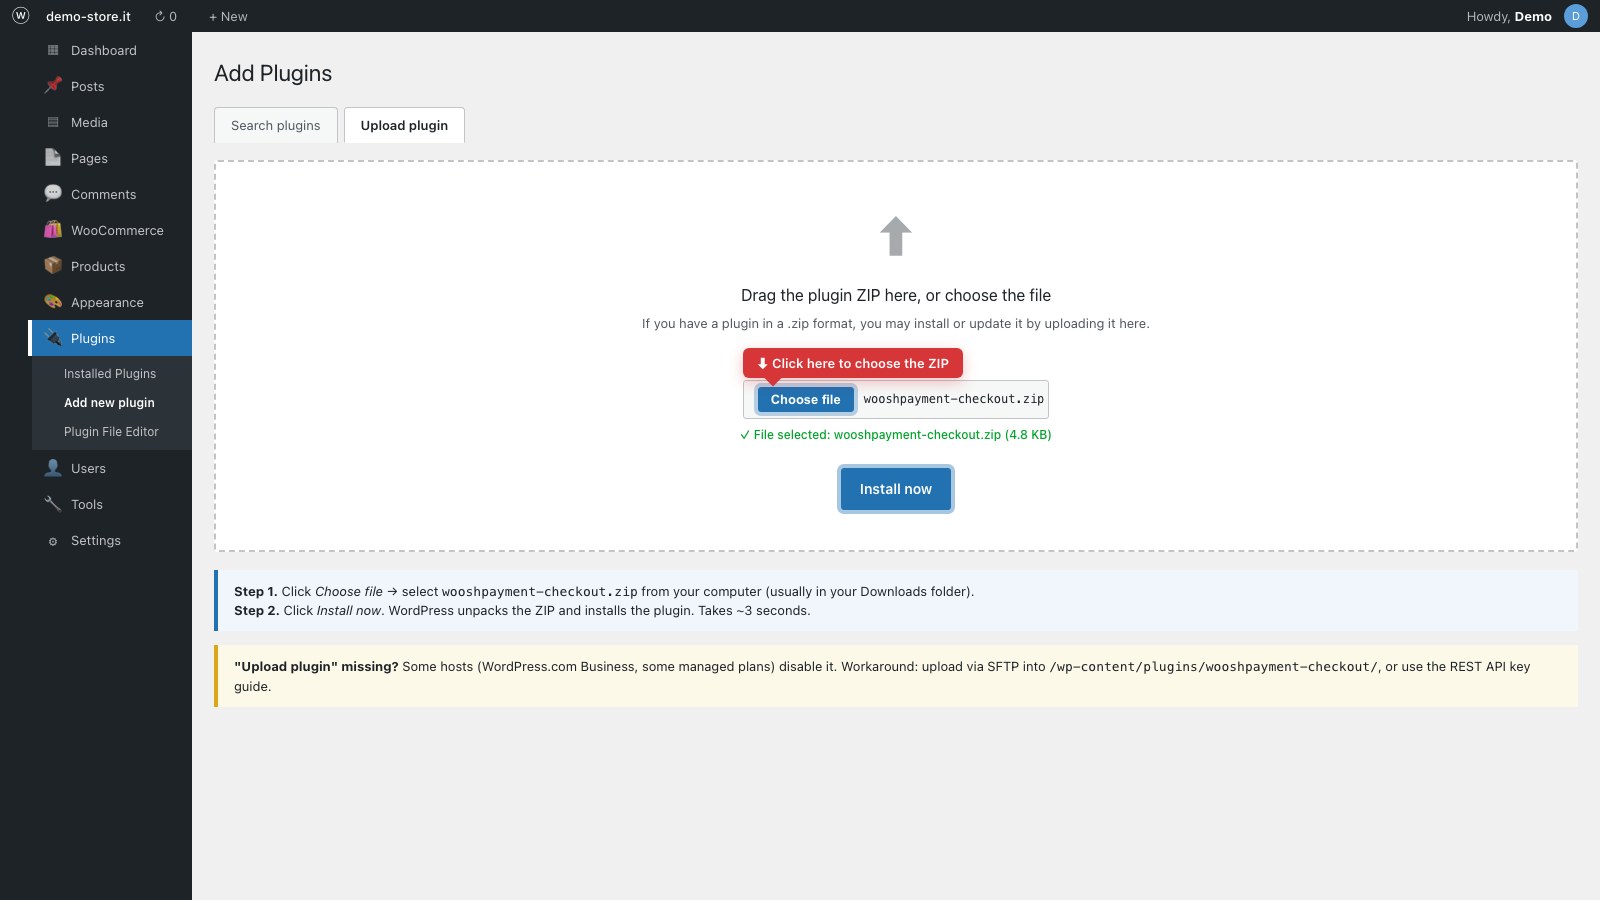
- Click Choose file → select
wooshpayment-checkout.zip(the one you downloaded at step 1) - Click Install now
Step 2.4 — Activate the plugin
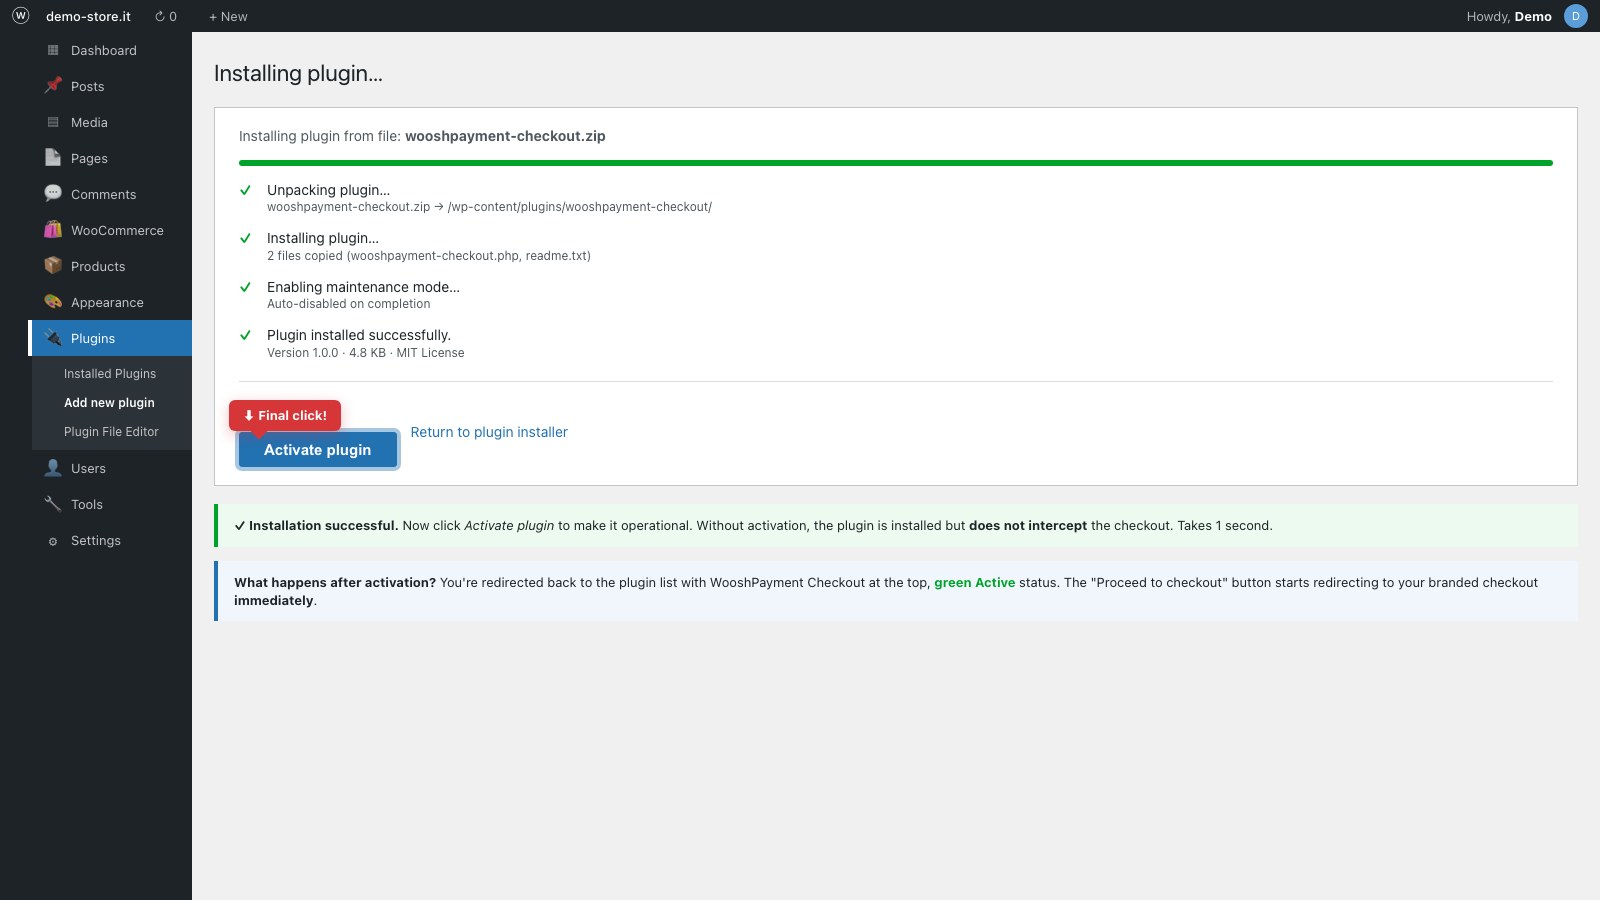
WP unpacks + installs in ~3 seconds. At the end the Activate plugin button appears — click it.
Step 2.5 — See the plugin in the list
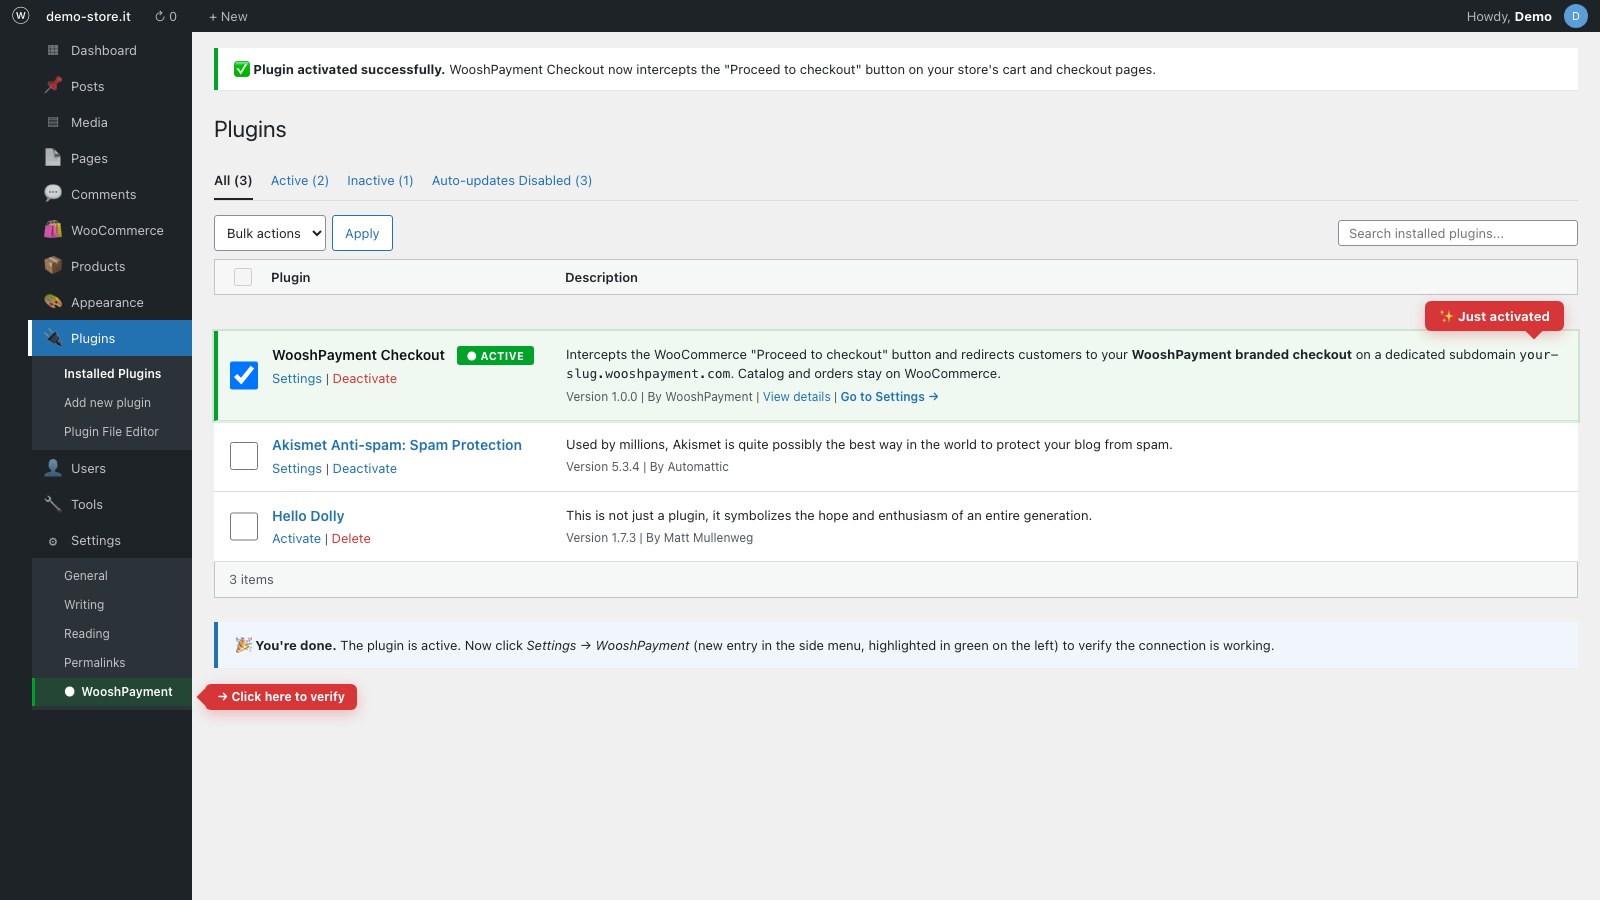
You land on the plugin list with WooshPayment Checkout at the top, green Active status. In the sidebar you'll find a new entry Settings → WooshPayment.
3. Verify it's running
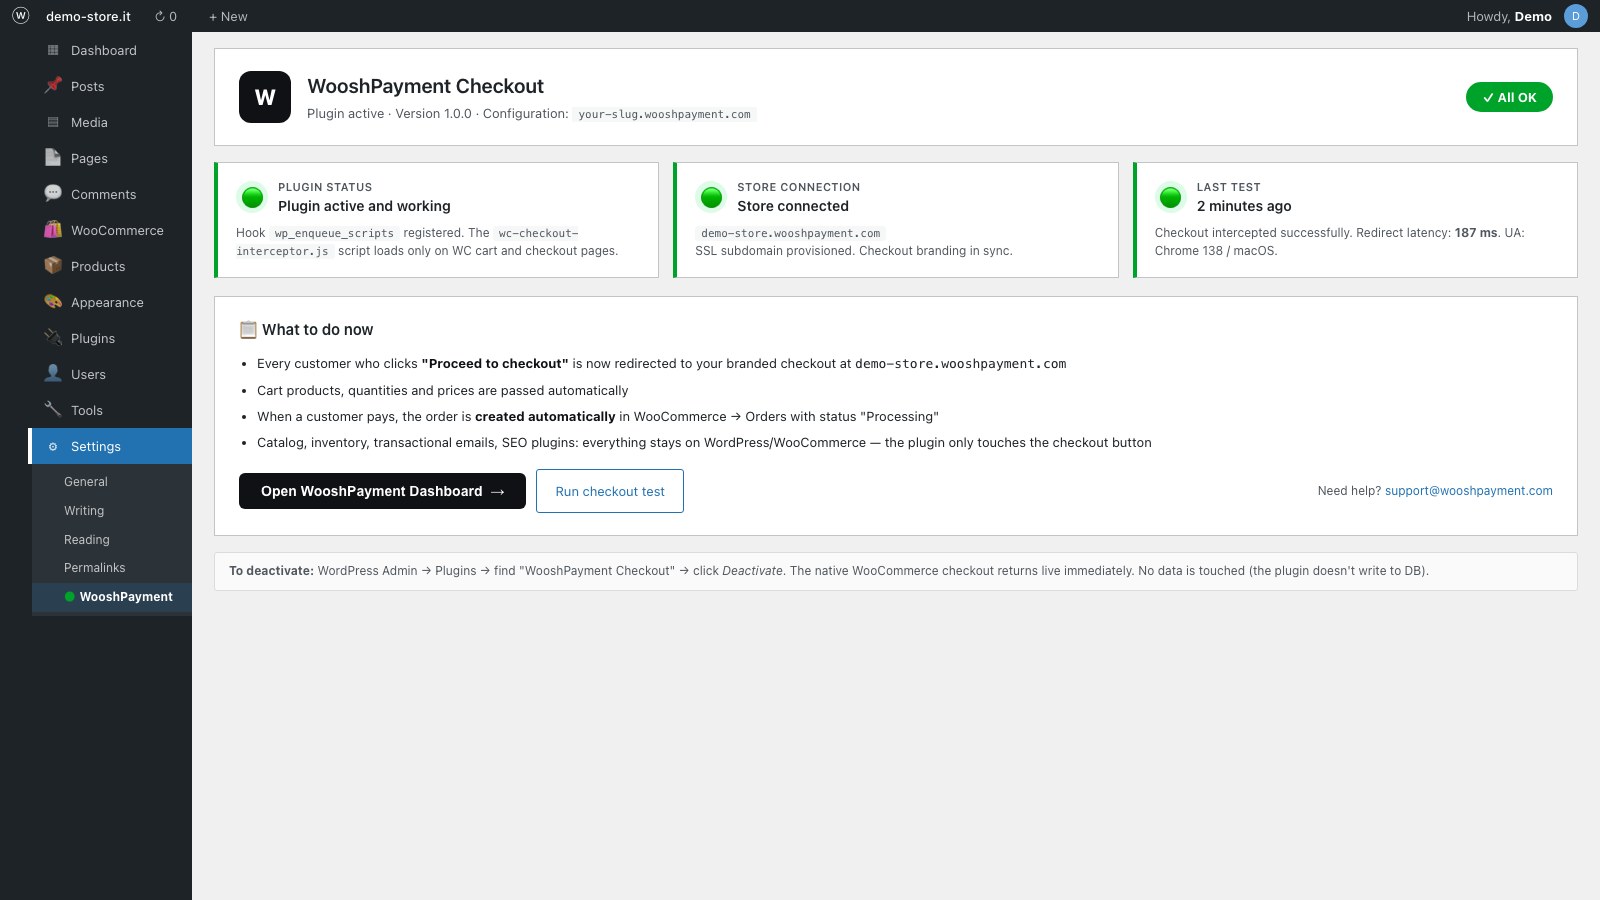
Go to Settings → WooshPayment (new entry in the Settings menu).
The plugin pings our server and shows the live status:
- 🟢 Green "recent checkout detected": plugin active, store connected, last checkout intercepted correctly
- 🟡 Yellow: plugin active but no recent checkouts (run a real test)
- 🔴 Red "Not connected": the merchant hasn't completed onboarding on wooshpayment.com (3 steps to fix shown on the page)
Green confirms the plugin + recent redirect path. It does not certify active plan, Whop/COD, Woo order, emails or pixel/CAPI yet: before traffic, always complete a paid pilot order from the live cart and verify the outcome in Dashboard → Orders.
If you see a warning "WooCommerce is not active", activate WooCommerce first. The WooshPayment plugin does nothing until WC is active.
4. Quick test
- Open your store as a visitor (incognito works)
- Add a product to the cart → go to
/cart/ - Click Proceed to checkout
- Expected: after the store is connected, the plan is active and Whop/COD is ready, you're redirected to
your-slug.wooshpayment.com/checkout/...instead of the native WC/checkout/page. If you're still on Demo/FREE, WooshPayment intentionally leaves the native checkout in passthrough. - The cart is pre-loaded (products, quantities, correct prices)
If you see the branded checkout, the redirect path works. Continue with a small real paid pilot from the live cart, or with Whop sandbox only if support explicitly enabled it, and verify the Woo order, customer/merchant emails, pixel/CAPI and dashboard order.
What the plugin does (exactly)
- Only on cart and checkout WC pages, enqueues the
wc-checkout-interceptor.jsscript from our CDN - The script intercepts the click on "Proceed to checkout" and reads the cart via WC Store API (
/wp-json/wc/store/v1/cart) - POST to
https://api.wooshpayment.com/api/checkout/createwith the cart products - Receives a branded
checkoutUrland redirects the customer - Forwards
utm_*parameters for Meta/TikTok/Google attribution - When payment succeeds on Whop, WooshPayment creates the real order on WooCommerce via REST (see next section)
Catalog, orders, inventory — all stay on WooCommerce
The plugin does not replace WooCommerce. Everything stays on WC:
| What | Where managed |
|---|---|
| Product catalog | WooCommerce (admin → Products) |
| Inventory / stock | WooCommerce |
| Received orders | WooCommerce (admin → Orders) — created by WooshPayment via API key |
| Order transactional emails | WooshPayment for customer confirmation + WooCommerce if enabled in your store |
| SEO plugins (Yoast, RankMath) | WordPress |
| Catalog theme / design | WordPress / your theme |
| Only the final checkout | WooshPayment |
To automatically create the order on WC after payment, WooshPayment needs a Consumer Key + Consumer Secret from your WC REST API. Generate once following the WC integration guide — the plugin alone isn't enough, because the JS script only handles the button redirect.
Summary of what you need for WooCommerce:
- WooshPayment Checkout plugin ← this guide — intercepts the checkout button
- WC REST API Consumer Key + Secret ← classic guide — to receive orders in the WC admin
Plugin without Consumer Key = the button may be intercepted, but setup remains incomplete and WooCommerce will not receive WooshPayment-created orders. Consumer Key without plugin = WooshPayment can validate the store, but the checkout button stays on the native WC checkout (no branding).
Both are needed.
Uninstall
- WordPress Admin → Plugins
- Find WooshPayment Checkout → click Deactivate
- (Optional) Click Delete to remove completely
The native WooCommerce checkout is available again after deactivation. No catalog / order row is touched. The plugin does not save permanent configuration; only the health-check cache transient may remain until it expires or is deleted.
Updates
For now plugin updates are manual: download a new wooshpayment-checkout.zip, go to Plugins, deactivate the old one, activate the new one.
Roadmap: publication on the official WordPress.org plugin directory for automatic WP updates. Q3 2026.
Troubleshooting
"Upload plugin" is missing — I only see "Add new plugin → Search plugins"
Some WordPress hosts (e.g. WordPress.com Business, some managed plans) have disabled custom plugin upload. If that's your case:
- Ask the provider to enable upload (usually enterprise tier)
- Or extract the zip, upload the files via SFTP into
/wp-content/plugins/wooshpayment-checkout/ - Or contact WooshPayment support before launch: REST API keys alone do not intercept the checkout button
Plugin activated but checkout button isn't intercepted
Open the browser console (Cmd/Ctrl+Shift+I) on your cart page and check:
- Is there a request to
https://api.wooshpayment.com/wc-checkout-interceptor.js? If no → the plugin isn't enqueuing the script. Verify the plugin is active + WooCommerce is active. - Does the script return 200? If 403/500 → problem on our side, email hello@wooshpayment.com.
- Console errors? Look for
[WooshPayment]messages. Common causes:/wp-json/wc/store/v1/cartfails → the WC Store API is not reachable. Check that permalinks are not set to "Plain", security/cache/WAF plugins are not blocking/wp-json/, and WooCommerce is updated and active.POST /api/checkout/create401 → your store isn't connected on WooshPayment yet. Complete step 9 of the WC integration guide (Consumer Key + Secret).
Accidentally deactivated the plugin
Reactivate from Plugins → WooshPayment Checkout → Activate. No re-setup needed.
WordPress multisite
The plugin works on WordPress multisite. Must be activated per site that has WooCommerce. Only sites where it's active + WC present will be intercepted.
Next steps
- Complete WooCommerce integration setup — Consumer Key, orders, webhook
- Configure Whop as the processor — required to accept cards on the branded checkout
- Brand the checkout — logo, colors and checkout copy of your subdomain
Questions? Email hello@wooshpayment.com or use the chat at the bottom-right of the dashboard.