Connecting Shopify with Dev Dashboard + OAuth
Step-by-step guide to connecting your Shopify store to WooshPayment with a dev app in the Dev Dashboard, Client ID + Secret, and OAuth install.
Connecting Shopify with Dev Dashboard + OAuth
WooshPayment does not use the old "paste an Admin API token and call it done" path for new merchants. The supported path is a personal dev app in your Shopify Dev Dashboard, installed through the OAuth authorization-code grant as a standalone app.
You give us Client ID + Client Secret, and we run OAuth against YOUR admin to get the access token. Do not treat setup as complete until the app is authorized, the ScriptTag is verified and the real live-cart test has passed.
Shopify treats REST Admin API and ScriptTag as a legacy path compared with new public apps/app embeds. WooshPayment uses it as a standalone integration to intercept your store cart: always validate it on the live theme before traffic. If the theme does not load ScriptTag or you are headless/custom, support or a dedicated app embed is required.
Already connected your store with the old method (shpat_… token)? Your existing connection keeps working as long as Shopify accepts it. For new connections and reconnects, use this Dev Dashboard + OAuth guide.
Prerequisites
- Owner access or staff enabled to manage apps on your Shopify store
- Your store domain (e.g.
my-store.myshopify.com) - An active WooshPayment account
1. Open the Dev Dashboard inside Shopify
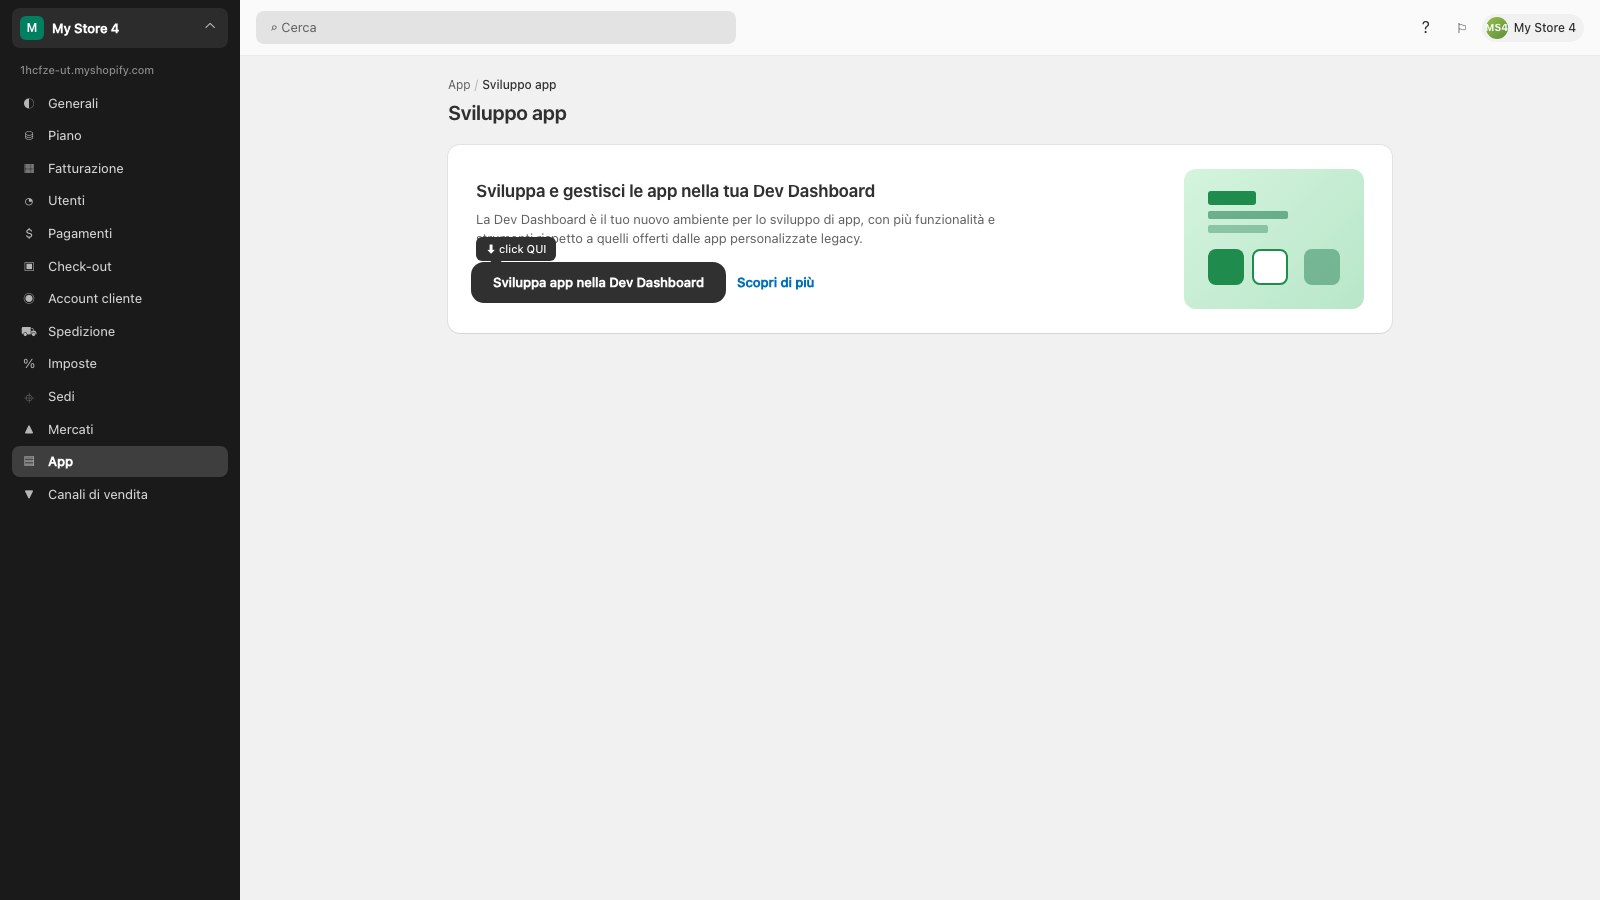
- Go to
https://my-store.myshopify.com/admin - Click the ⚙ Settings icon at the bottom-left (or
,on the keyboard) - In the left column, click Apps
- Top-right, click App development
- In the card Develop and manage apps in your Dev Dashboard, click the dark button Build apps in Dev Dashboard
The Shopify Dev Dashboard opens (in a new tab or overlay).
Some Shopify admins can still show legacy paths or different labels depending on the store type. For WooshPayment, always use the Dev Dashboard and not the manual shpat_… token path.
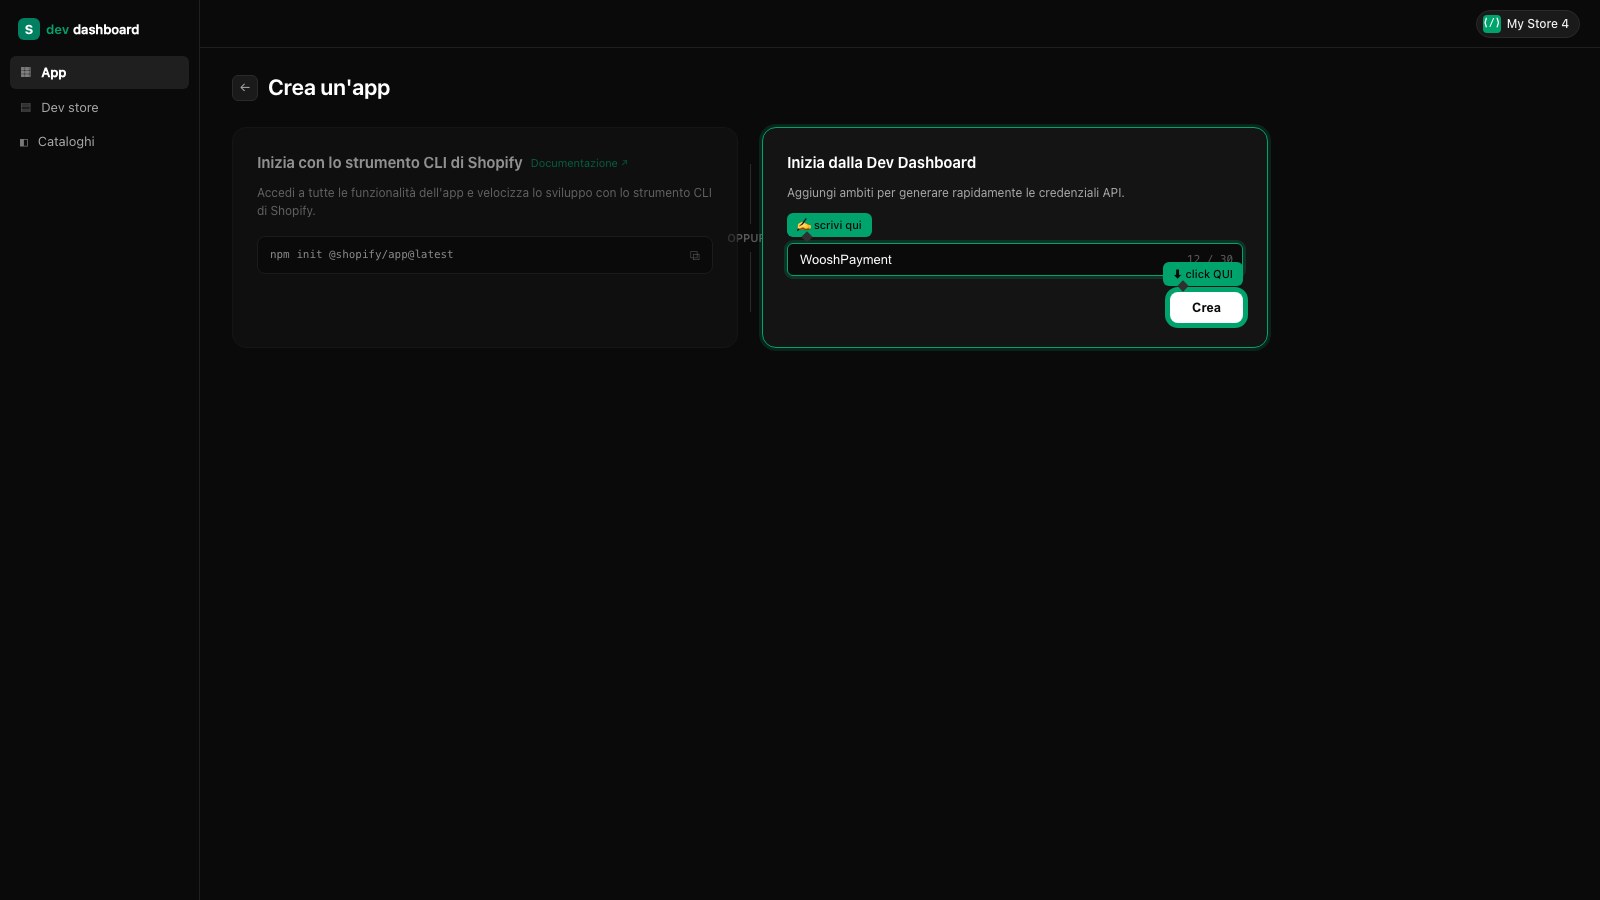
2. Create a new app in the Dev Dashboard
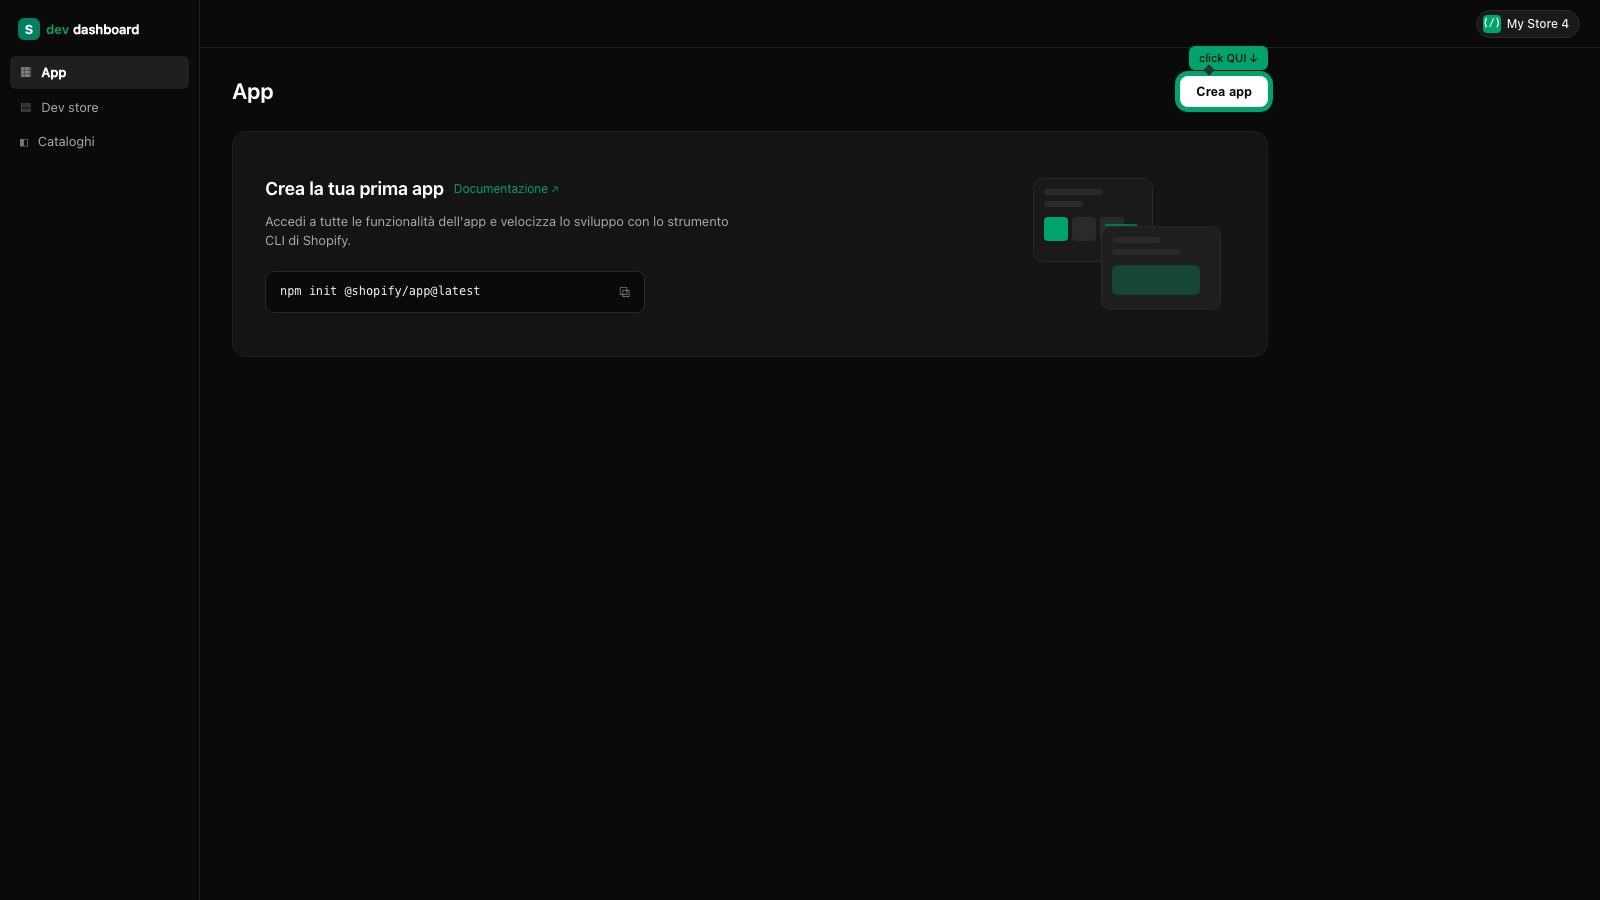
- Inside the Dev Dashboard, click the Create app button in the top-right
- You land on the dedicated "Create an app" page with two side-by-side cards:
- Get started with the Shopify CLI tool (for advanced devs with the local Shopify CLI)
- Get started from the Dev Dashboard (simpler, no CLI required) → pick this one
- In the App name field type
WooshPayment(or any name you recognize) - Click Create
You land on the newly-created app page. From the app sidebar you can access Monitoring, Logs, Versions, Settings.
3. Create a version: configure URLs and disable embed
From the Versions section of the app, click Create version. A dedicated Create version page opens (not a tab — a full page):
- URLs section → App URL: paste
https://wooshpayment.com - Right below, find the Embed app in Shopify admin checkbox — it's checked by default. UNCHECK IT.
- Leave the Preferences URL field empty (optional)
Important: the App URL field must be https://wooshpayment.com, NOT the /auth/shopify/callback link. That link goes ONLY in the Redirect URL field (step 4). If you set the callback as the App URL, opening the app in Shopify shows the Missing required parameters error — because Shopify opens the App URL without the OAuth parameters.
The Embed app in Shopify admin checkbox can be CHECKED by default in the Dev Dashboard. You must manually uncheck it before releasing the version, or the OAuth handshake fails (Shopify tries to embed WooshPayment inside the admin iframe and we're not an embedded app).
4. Configure access scopes
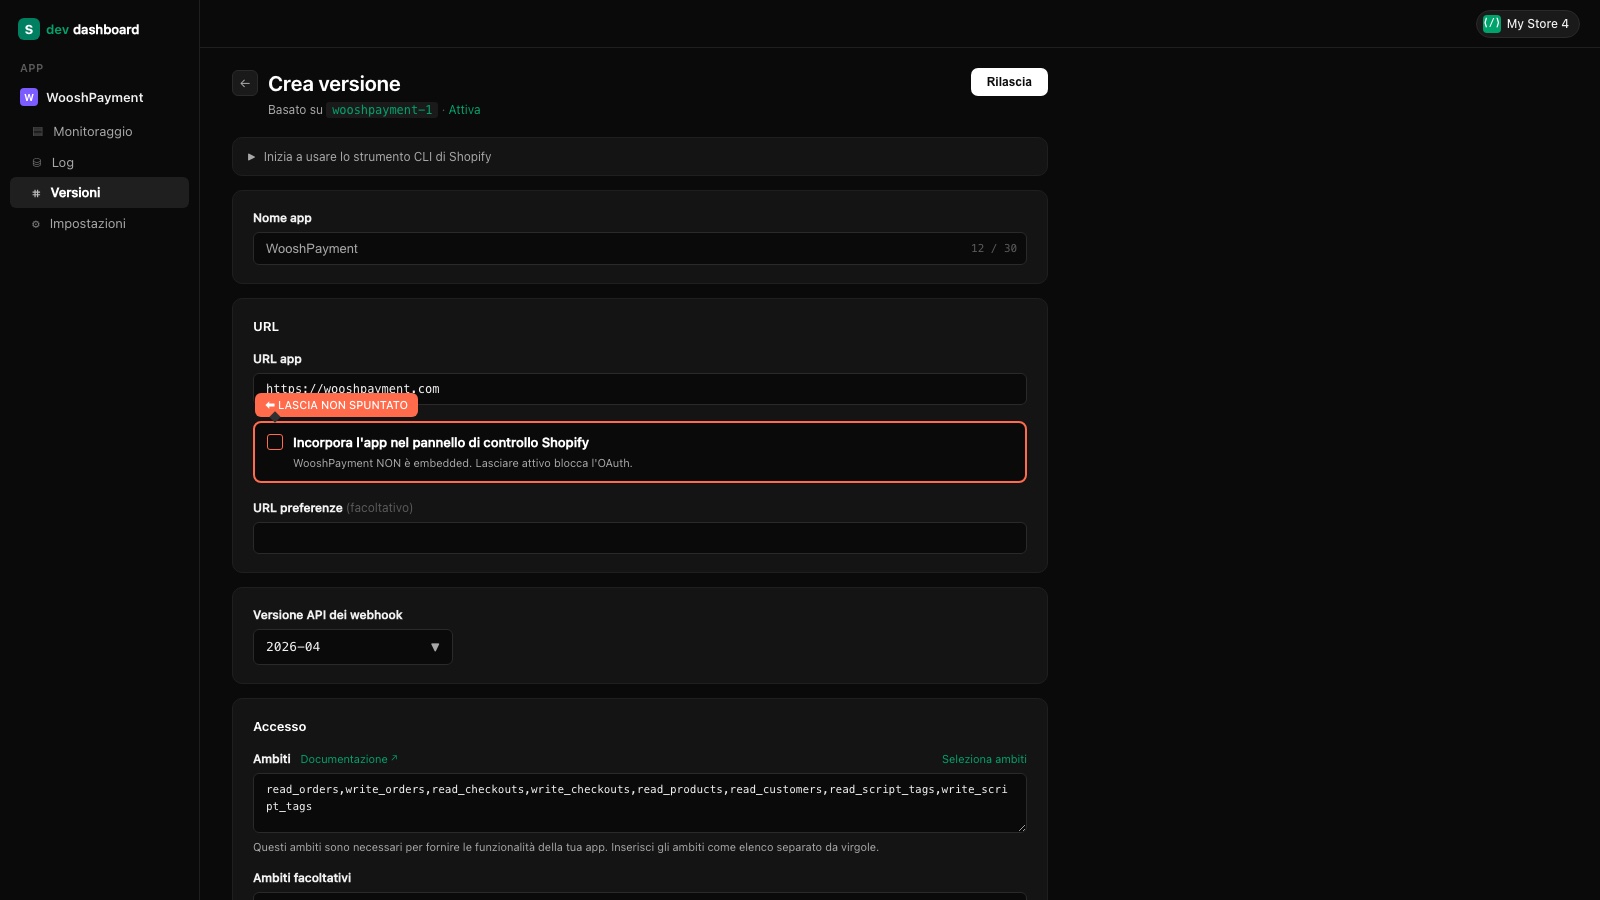
Scroll down to the Access section:
-
Scopes: in the current Dev Dashboard this is a single textarea with scopes separated by commas (not individual checkboxes). Paste exactly:
read_orders,write_orders,read_checkouts,write_checkouts,read_products,read_customers,read_script_tags,write_script_tagsThese are the 8 scopes and what they do:
Technical scope What for read_ordersRead existing orders write_ordersCreate the order after payment confirmed read_checkoutsRead in-progress checkout session write_checkoutsUpdate the checkout session read_productsRead catalog, prices, variants read_customersAuto-fill address for known customers read_script_tagsVerify the script tag write_script_tagsInstall the script that intercepts the Checkout button -
Optional scopes: leave empty
-
Use legacy install flow: leave UNCHECKED
-
Redirect URL (at the bottom of the form, still inside the Access section): paste
https://api.wooshpayment.com/auth/shopify/callback
5. Release the version
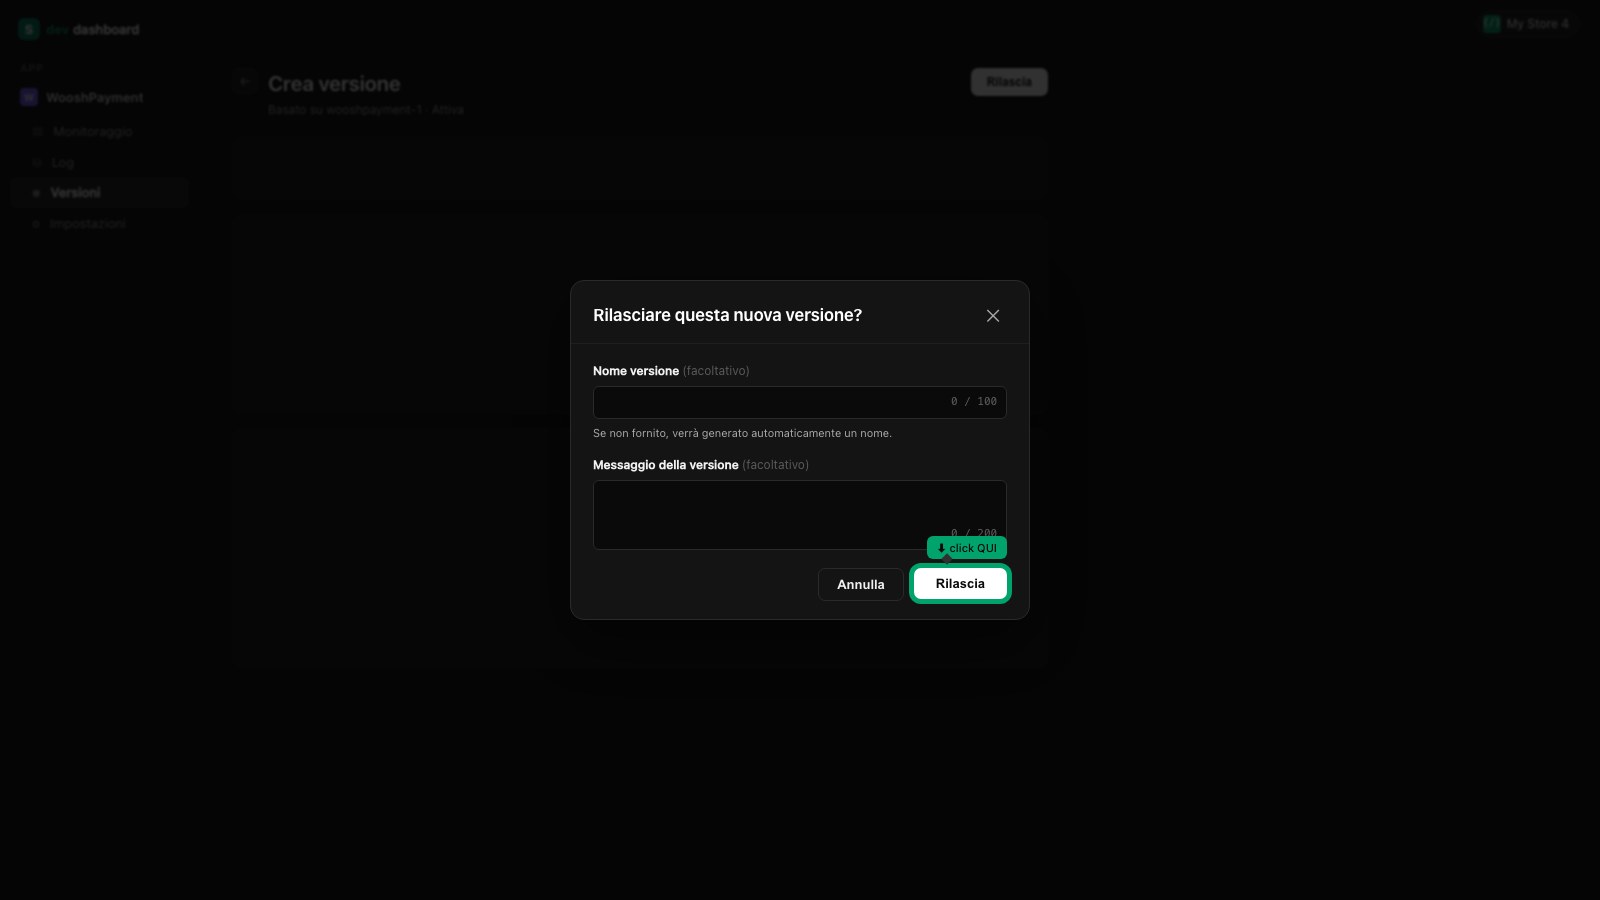
- At the bottom-right of the Create version page, click the Release button
- The Release this app version? modal opens
- (Optional) Fill Version name and Version message — you can leave both empty, Shopify auto-generates a name
- Click the Release button in the modal
Wait for the confirmation toast. The new version becomes Active.
6. Copy Client ID + Secret
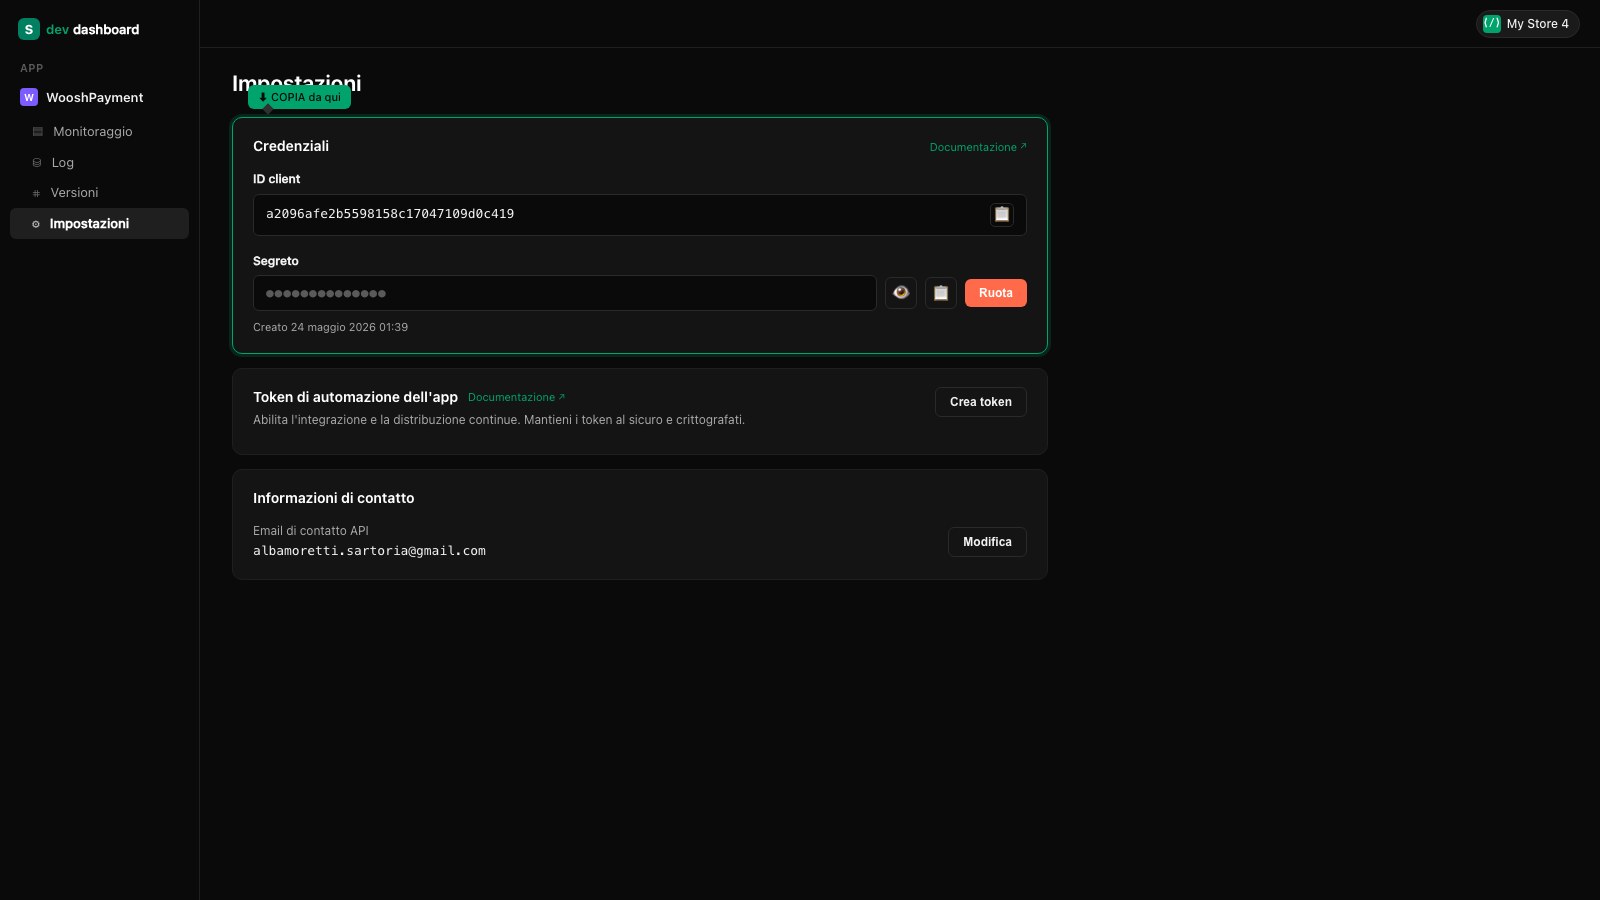
From the app sidebar, click Settings:
- Find the Credentials card
- Client ID: copy the value (visible in full, ~32 chars) by clicking the 📋 icon on the right
- Secret: it's masked. Click the 👁 icon to reveal it, then 📋 to copy it
- If asked and you've already used it, click the Rotate button to generate a new one (the old one becomes invalid)
The Secret is shown in cleartext only after clicking 👁 (current session). If you close the tab without copying it, you'll need to click Rotate to generate a new one — the old one becomes invalid and all previous OAuth sessions are invalidated.
7. Paste into WooshPayment and complete install
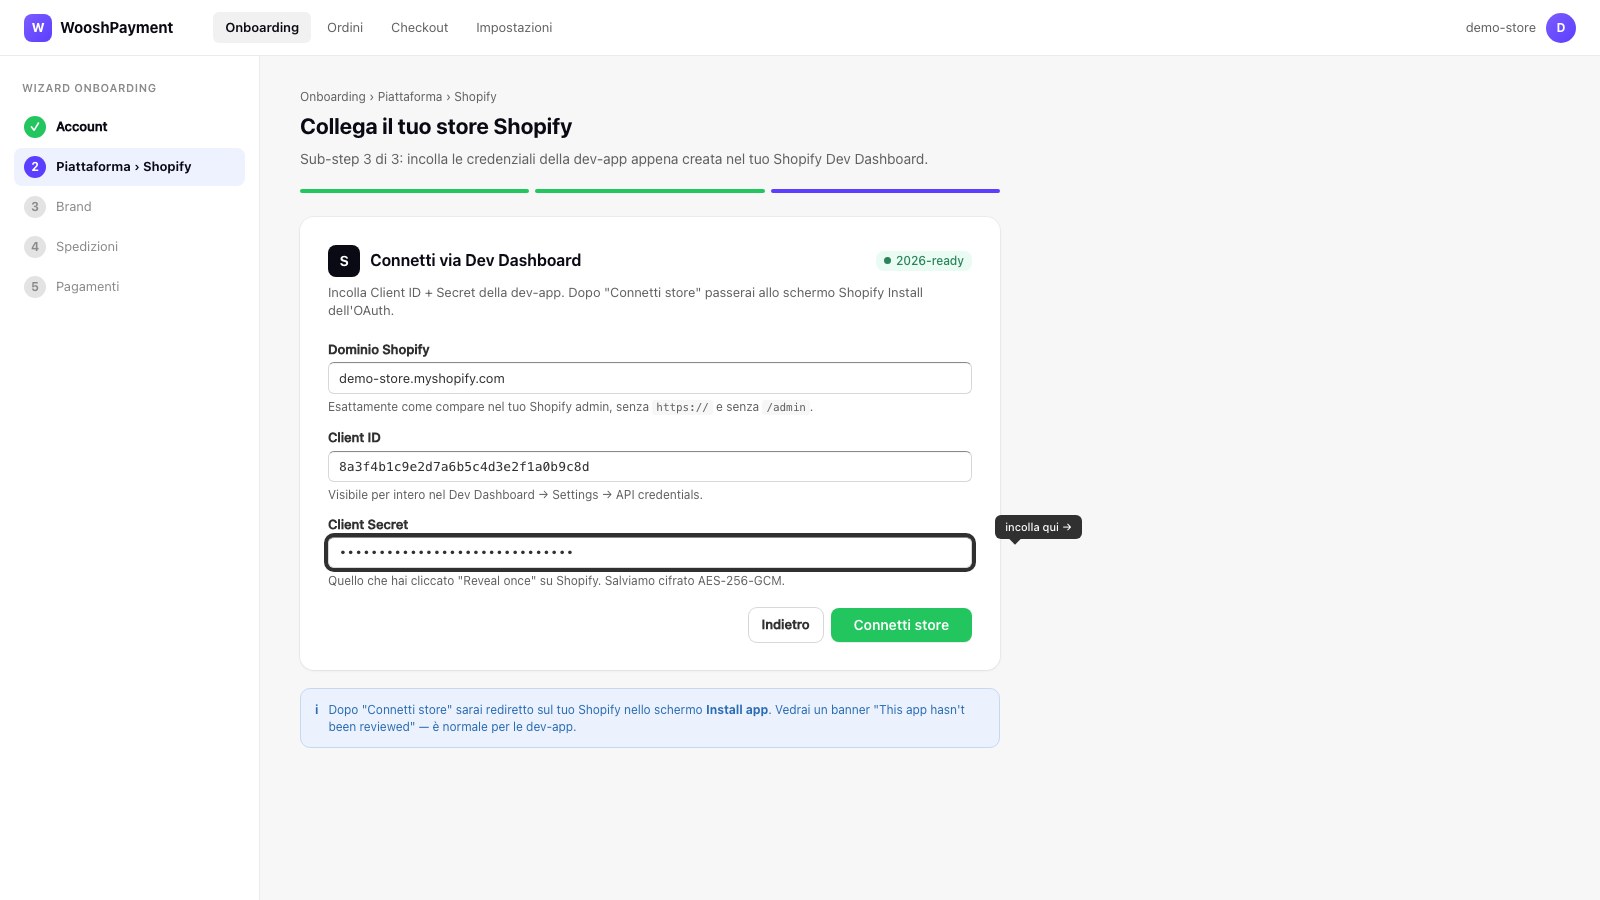
- Open https://wooshpayment.com/onboarding in another tab
- Step Platform → Shopify, scroll to sub-step 3 (Paste Client ID + Secret)
- Fill:
- Shopify domain:
my-store.myshopify.com - Client ID: the Client ID copied at step 6
- Client Secret: the Secret copied at step 6
- Shopify domain:
- Click Connect store
You're redirected to Shopify's Install app screen. You'll see a banner "This app hasn't been reviewed" — that's normal for dev-apps not in the App Store.
- Click Install in the Shopify panel
- You return automatically to WooshPayment on the Brand step of the onboarding
Returning to the Brand step confirms OAuth succeeded. It is not traffic approval yet: complete active plan, Whop/COD and at least one paid pilot order from the live cart before launching ads.
What WooshPayment does at this point
- 🔐 Stores Client ID + Secret encrypted (AES-256-GCM) on our DB
- 🔄 Receives the OAuth token and stores it (always encrypted)
- 📜 Installs the script tag on your active Shopify theme and requires a real live-cart test before traffic
- 🌐 Provisions your subdomain
your-slug.wooshpayment.com(Vercel DNS + SSL) - ✨ Takes you to complete onboarding (brand, shipping, payments)
After setup, verify from the published Shopify cart that the Checkout click redirects to your branded checkout your-slug.wooshpayment.com/checkout/.... If the live theme does not load ScriptTag or the channel is headless/custom, do not send traffic: support or a dedicated app embed is required. Orders paid through WooshPayment are created as real Shopify orders with financial_status: paid.
Troubleshooting
"Invalid Client ID or Secret"
Check in order:
- Did you click Release at step 5? Without a released version, OAuth won't start.
- Did you copy the Client ID in full? No spaces before/after.
- Is the Secret correct? If you closed the tab without copying it, go to Settings → Credentials → Rotate to generate a new one.
The "Embed app in Shopify admin" checkbox is CHECKED by default
Yes, it can be on by default. You must manually uncheck it before releasing the version, or OAuth fails (Shopify tries to embed WooshPayment in an iframe and we're not an embedded app).
Shopify says "Embed app must be enabled"
You left the Embed app in Shopify admin checkbox checked at step 3. Open Versions → Create version, uncheck it, release a new version, then click Connect store again in the WooshPayment dashboard.
I only see "App URL" and "Redirect URL" separately, there's no "Access" section
That's normal. In the Dev Dashboard, Redirect URL lives at the bottom of the Create version form, inside the Access section, after the Scopes textarea — it's not in a separate section.
The "Install" button on Shopify doesn't activate
Usually missing scopes in the Scopes textarea. Open Versions → Create version, check that all 8 scopes are in the textarea comma-separated, release again, repeat step 7.
I want to remove the app
- Go to Shopify Dev Dashboard → your WooshPayment app
- Settings sidebar → at the bottom, Delete app button
The token becomes invalid immediately, the script tag is removed from the theme, the WooshPayment integration goes into the "not connected" state.
Can I use the old method (shpat_ token) instead?
Not for new WooshPayment connections. If you have an old connection that already works, you can leave it active; for new stores or reconnects use Dev Dashboard + OAuth.
Need a hand? Email hello@wooshpayment.com or use the chat at the bottom-right of the dashboard.